Zoom Setup Guide
Zoom meeting or Zoom webinar?
Zoom Meeting is usually used when you want most of the participants to speak. Zoom Webinar is for a lecture-like scenario where only a few people speak while others listen. Below is a practical summary that we find most helpful for the event organizers. For detailed feature comparison, please check here.
| Zoom Meeting | Zoom Webinar (Recommended) | |
| Turn on Audio/Video | All participants can turn on themselves | Only speakers and panelists can control |
| Chat | All participants can chat with each other | The host can control whether the audience can chat |
| Zoom Q&A | No | Yes |
| Zoom Poll | No | Yes |
| Practice Room | No | Yes |
| Good For | Group meetings | Talks, lectures, keynotes, and panel discussions |
Scheduling a webinar
This section describes how to create Zoom meeting/webinar on your Zoom dashboard.
![]() Whova released Advanced Zoom Integration where you can directly create the Zoom meeting/webinar in Whova. Click here for the steps.
Whova released Advanced Zoom Integration where you can directly create the Zoom meeting/webinar in Whova. Click here for the steps.
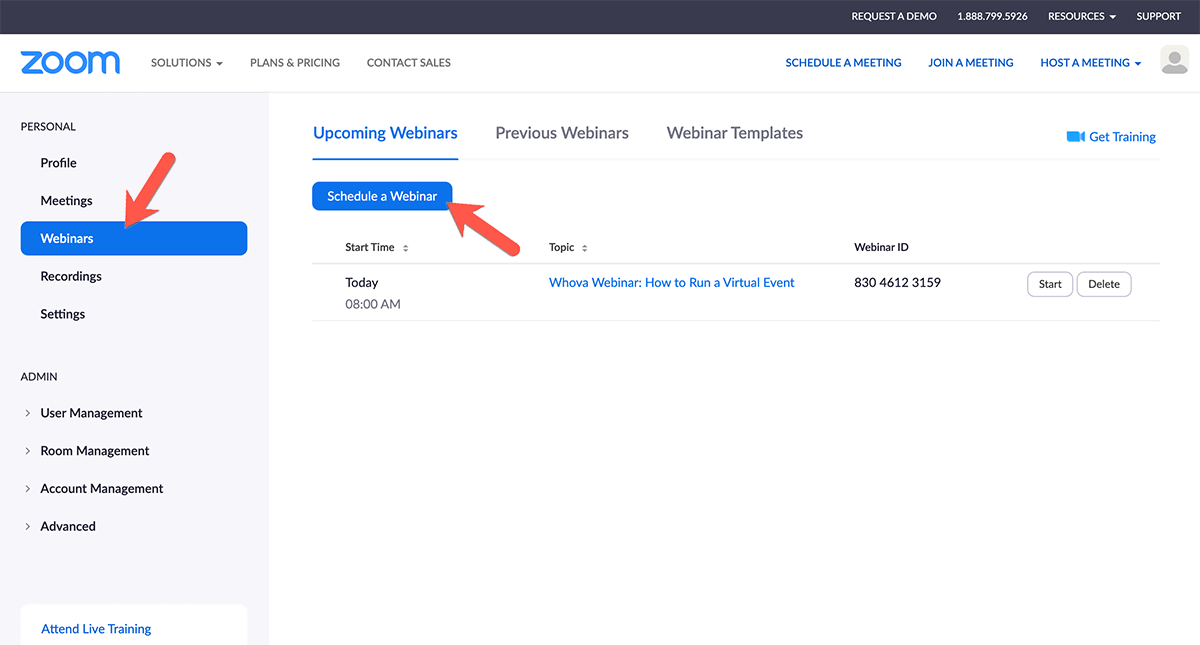
- Sign in to Zoom’s web portal. On the left-hand side, under Personal, click Webinars, and then click Schedule a Webinar.
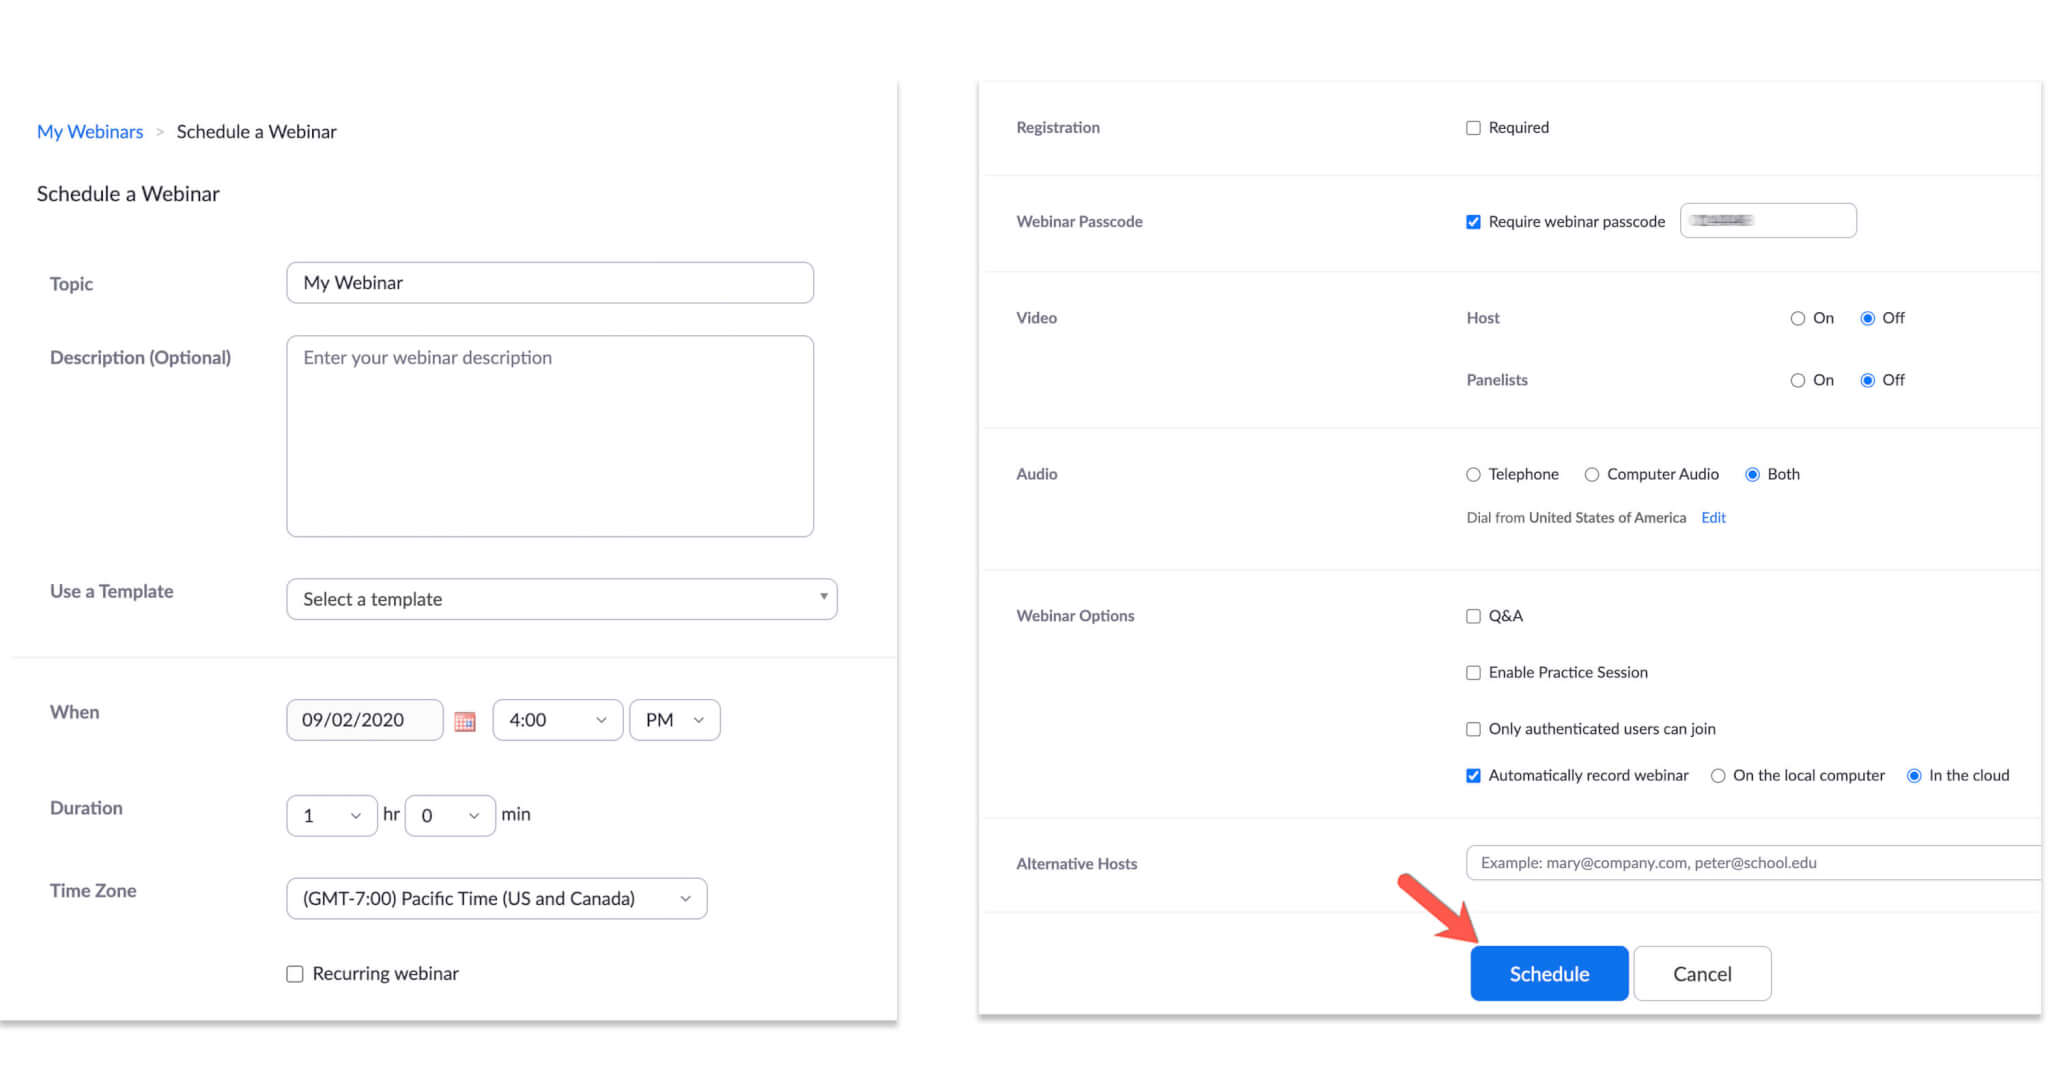
- Fill in your webinar details, such as the title, a description, and the time and date. If you’ve saved a previous webinar’s settings as a template, and want to use them again, just select the name of that webinar under Use a template.
- There are several other settings available. If you are not sure, please refer to our “Recommended Settings” section.
- Enter the emails of any alternative hosts.
- Click Schedule.
- Your webinar will now appear on your list of upcoming webinars.
- To begin the webinar, click Start on the right side of the webinar name.
- You can always click the webinar to edit it. If you have many sessions that are similar, we also recommend that you click Save this Webinar as a Template, so that you can create other webinars faster and also avoid missing some settings.
Adding Speakers/Panelists
- Sign into Zoom’s web portal. On the left-hand side, under Personal, click Webinars.
- Click the name of your webinar you want to add speakers.
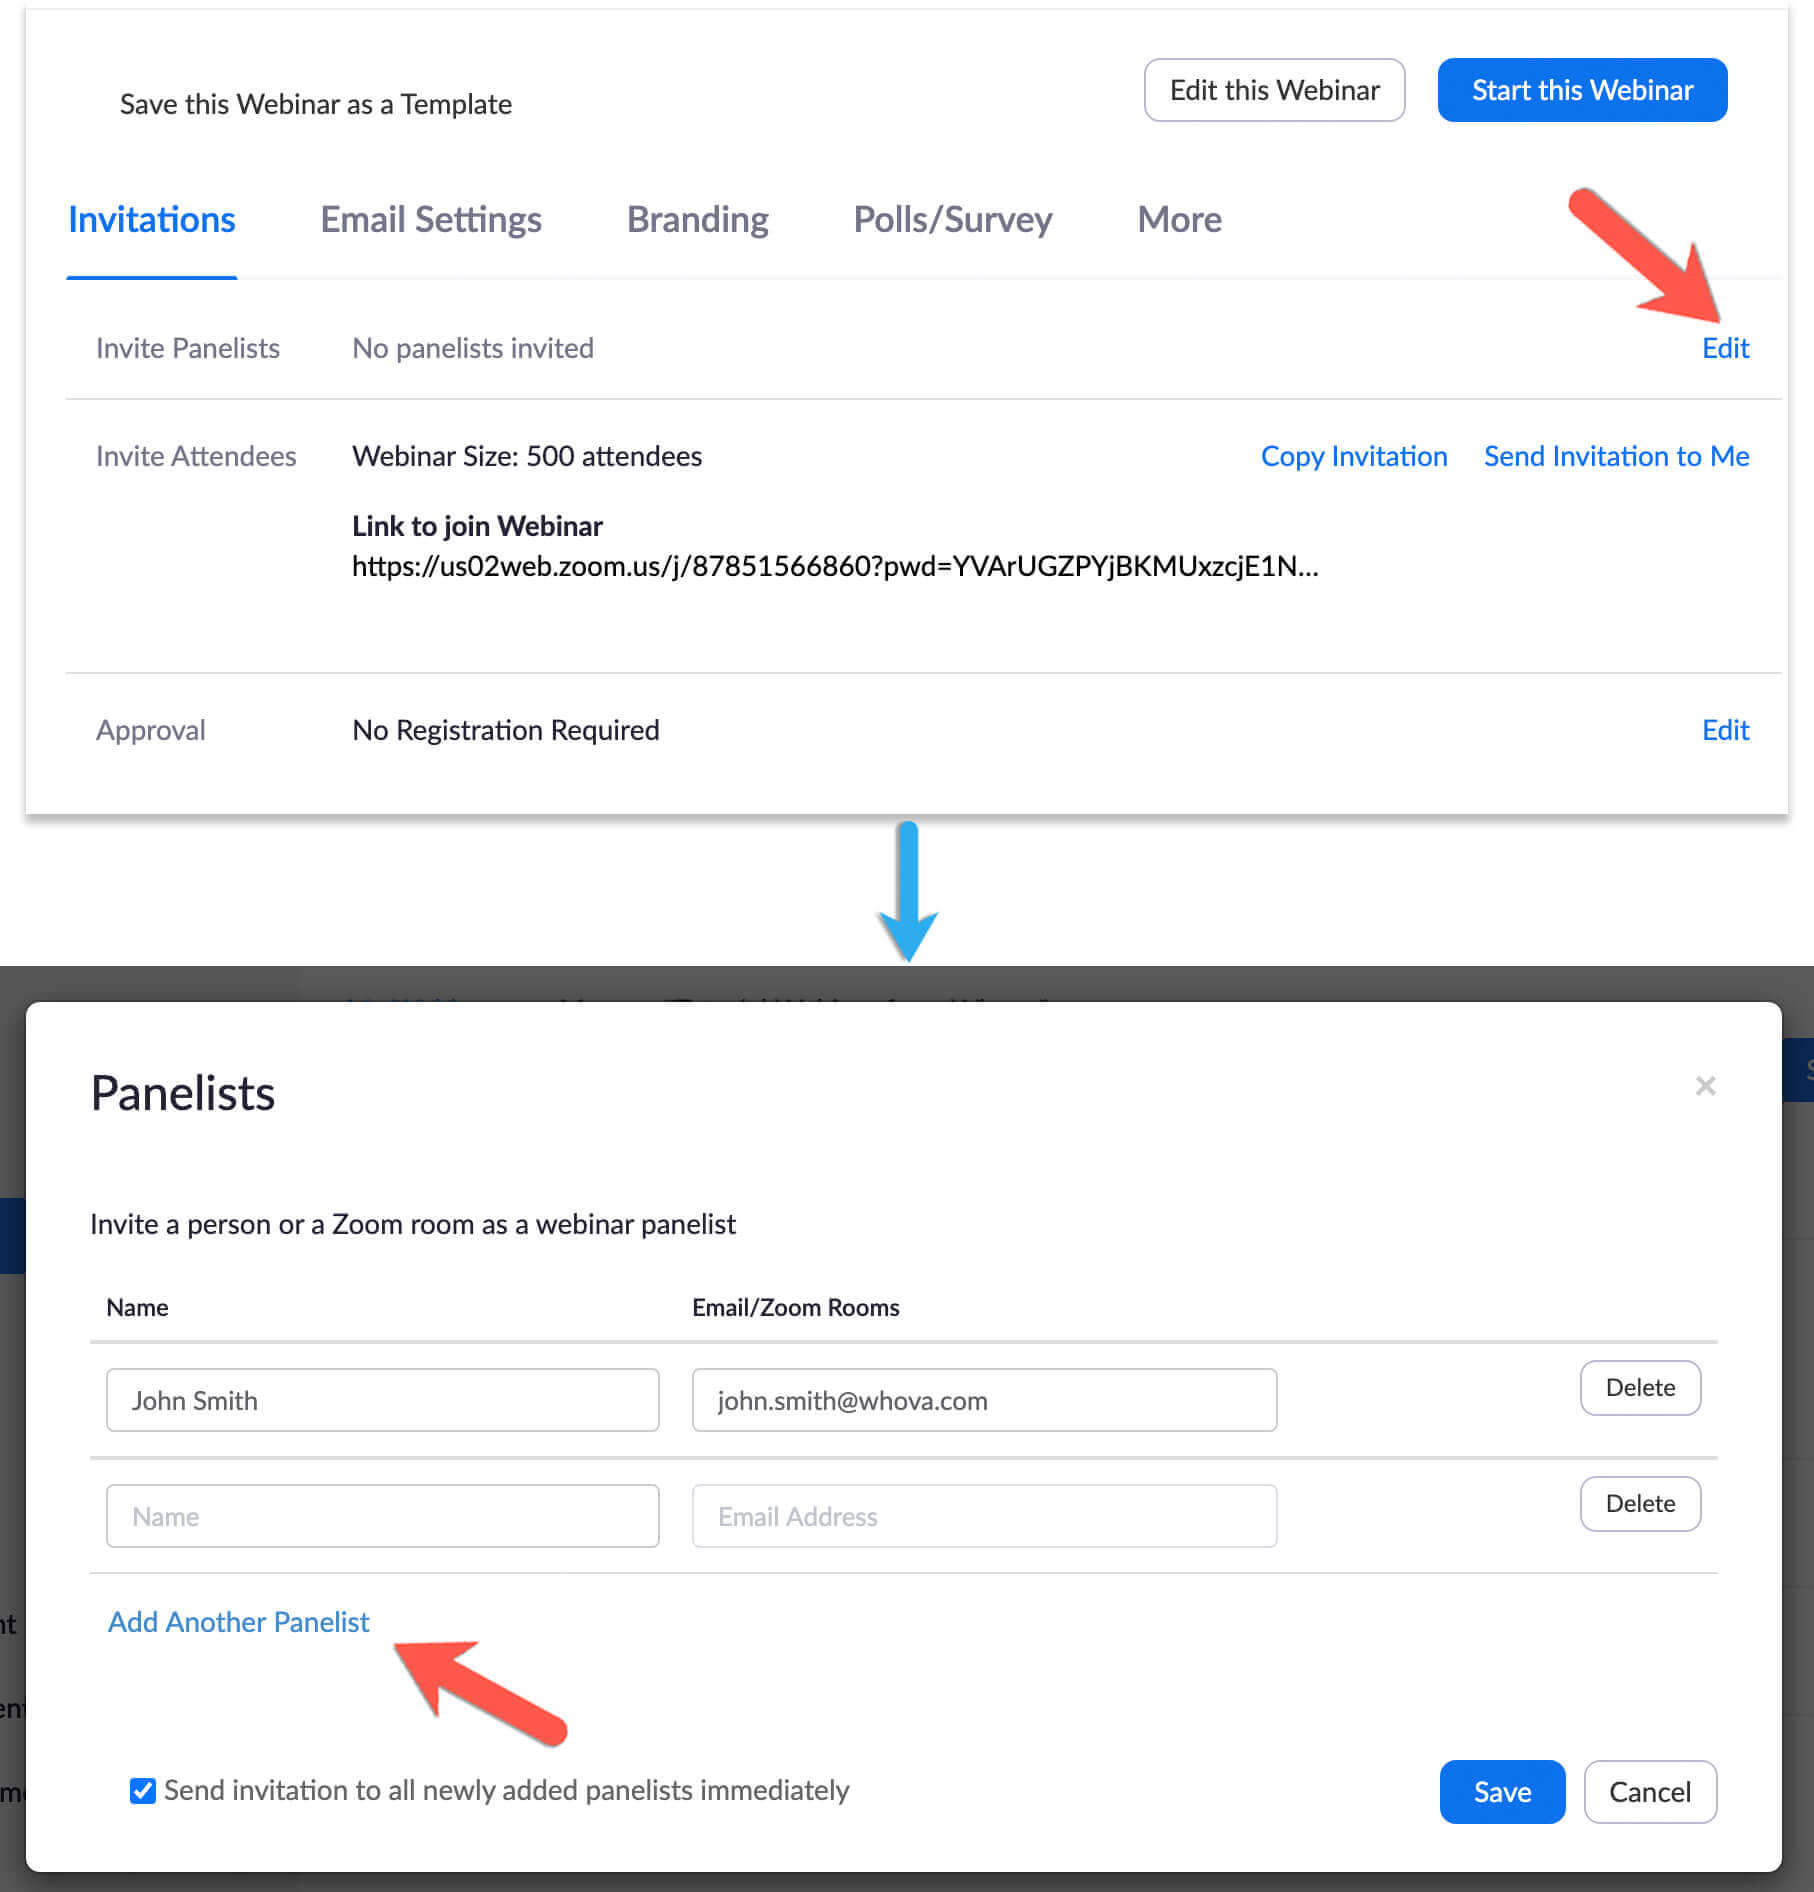
- Scroll to the bottom of the screen, where you should see a tab called Invitations. Click Edit next to Invite Panelists.
- Click Add Another Panelist to add all the speakers/panelists you want to invite. The invitees will receive an email including the Zoom link to join the session.
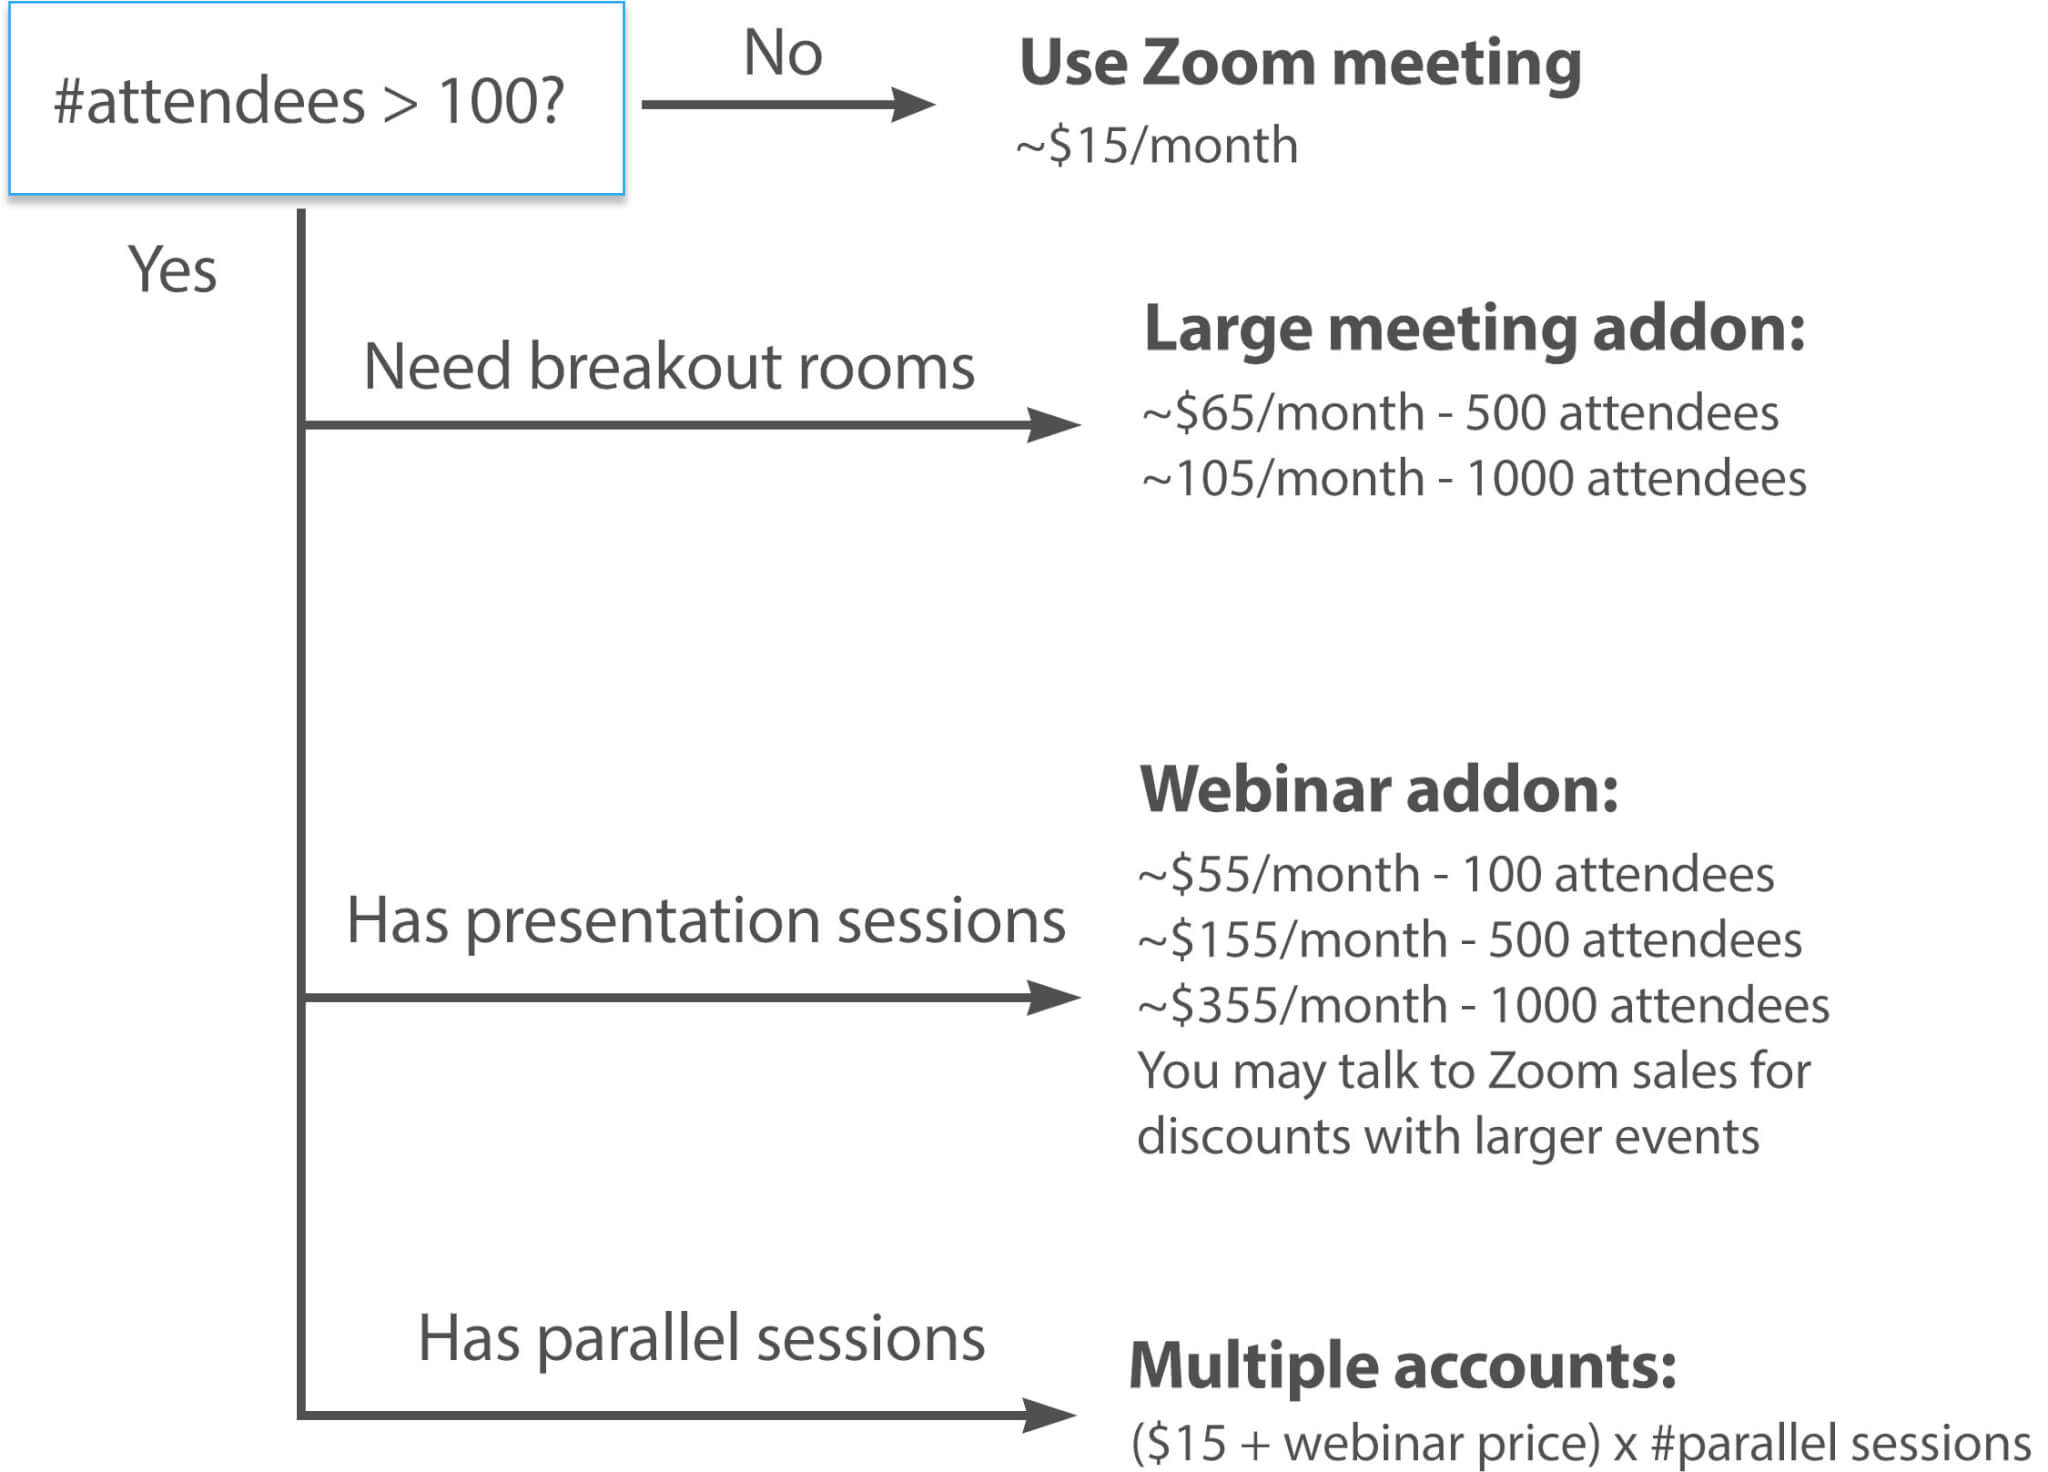
Creating simultaneous sessions
While you can add an unlimited number of simultaneous sessions in Whova, you need to purchase additional licenses from Zoom in order to stream them all at the same time. There are 2 options to do so:
Option 1: Use multiple Zoom accounts (easiest and recommended)
The easiest way to set up simultaneous livestreams is to create meetings/webinars from multiple Zoom accounts. Each account can start a livestream separately without any problems. For example, if you’re running five simultaneous live sessions, then you will need to have five different Zoom accounts to create/start the five Zoom meetings separately.
![]() Whova allows you to connect multiple Zoom accounts to Whova to create separate meetings. See how to connect your Zoom accounts to Whova.
Whova allows you to connect multiple Zoom accounts to Whova to create separate meetings. See how to connect your Zoom accounts to Whova.
Option 2: Use one Zoom account with multiple licenses
If you don’t have the access to multiple Zoom accounts, you can create simultaneous meetings/webinars with one account. However, on Zoom, one user license can only start/host one meeting at any time. In order to start multiple meetings at the same time, you need to add other user accounts as the “Alternate Host”. Then at the event, those “Alternate Hosts” can start each meeting/webinar at the same time.
* Please note that “Alternate hosts” also have to be licensed users on Zoom and cannot be accounts with free/basic plans. So if those accounts are not licensed users, you have to purchase multiple user licenses first and assign the licenses to them. Here are the steps:
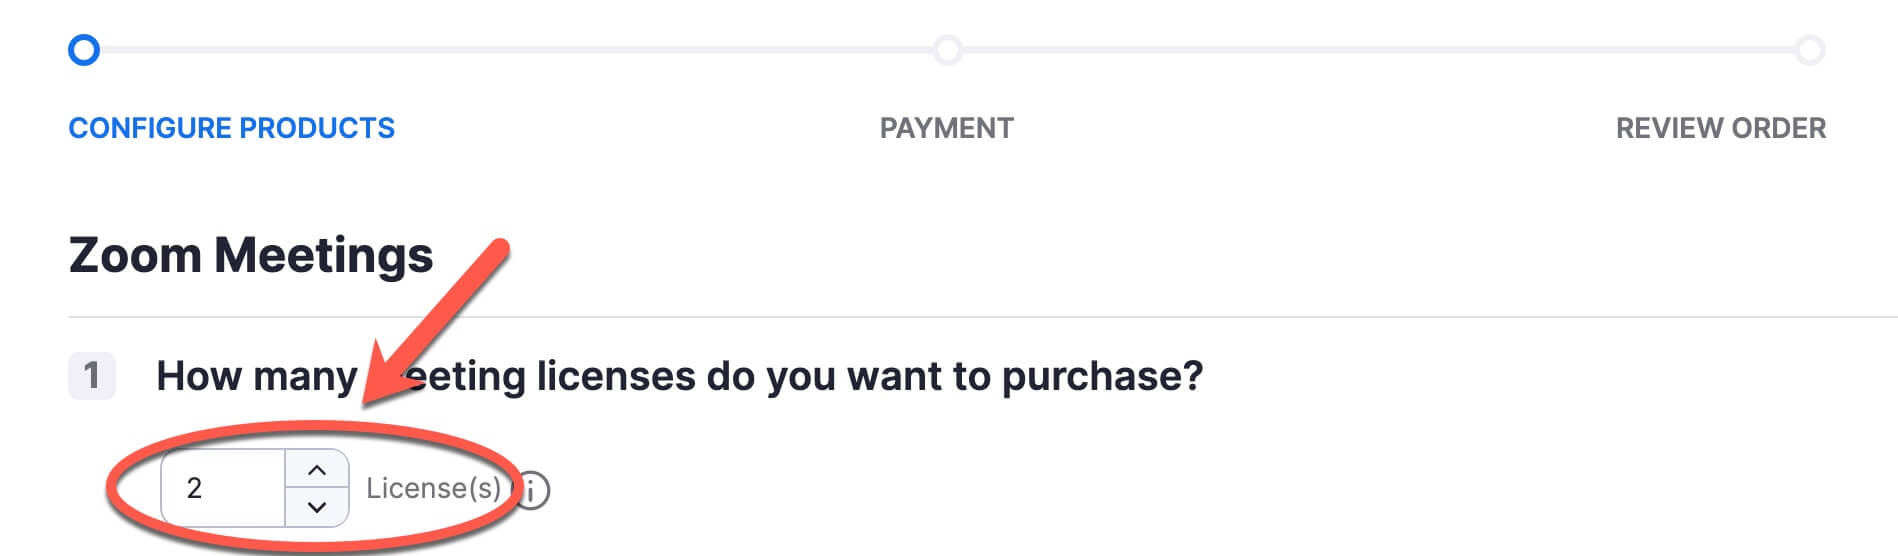
- Go to the billing page and edit your plan.
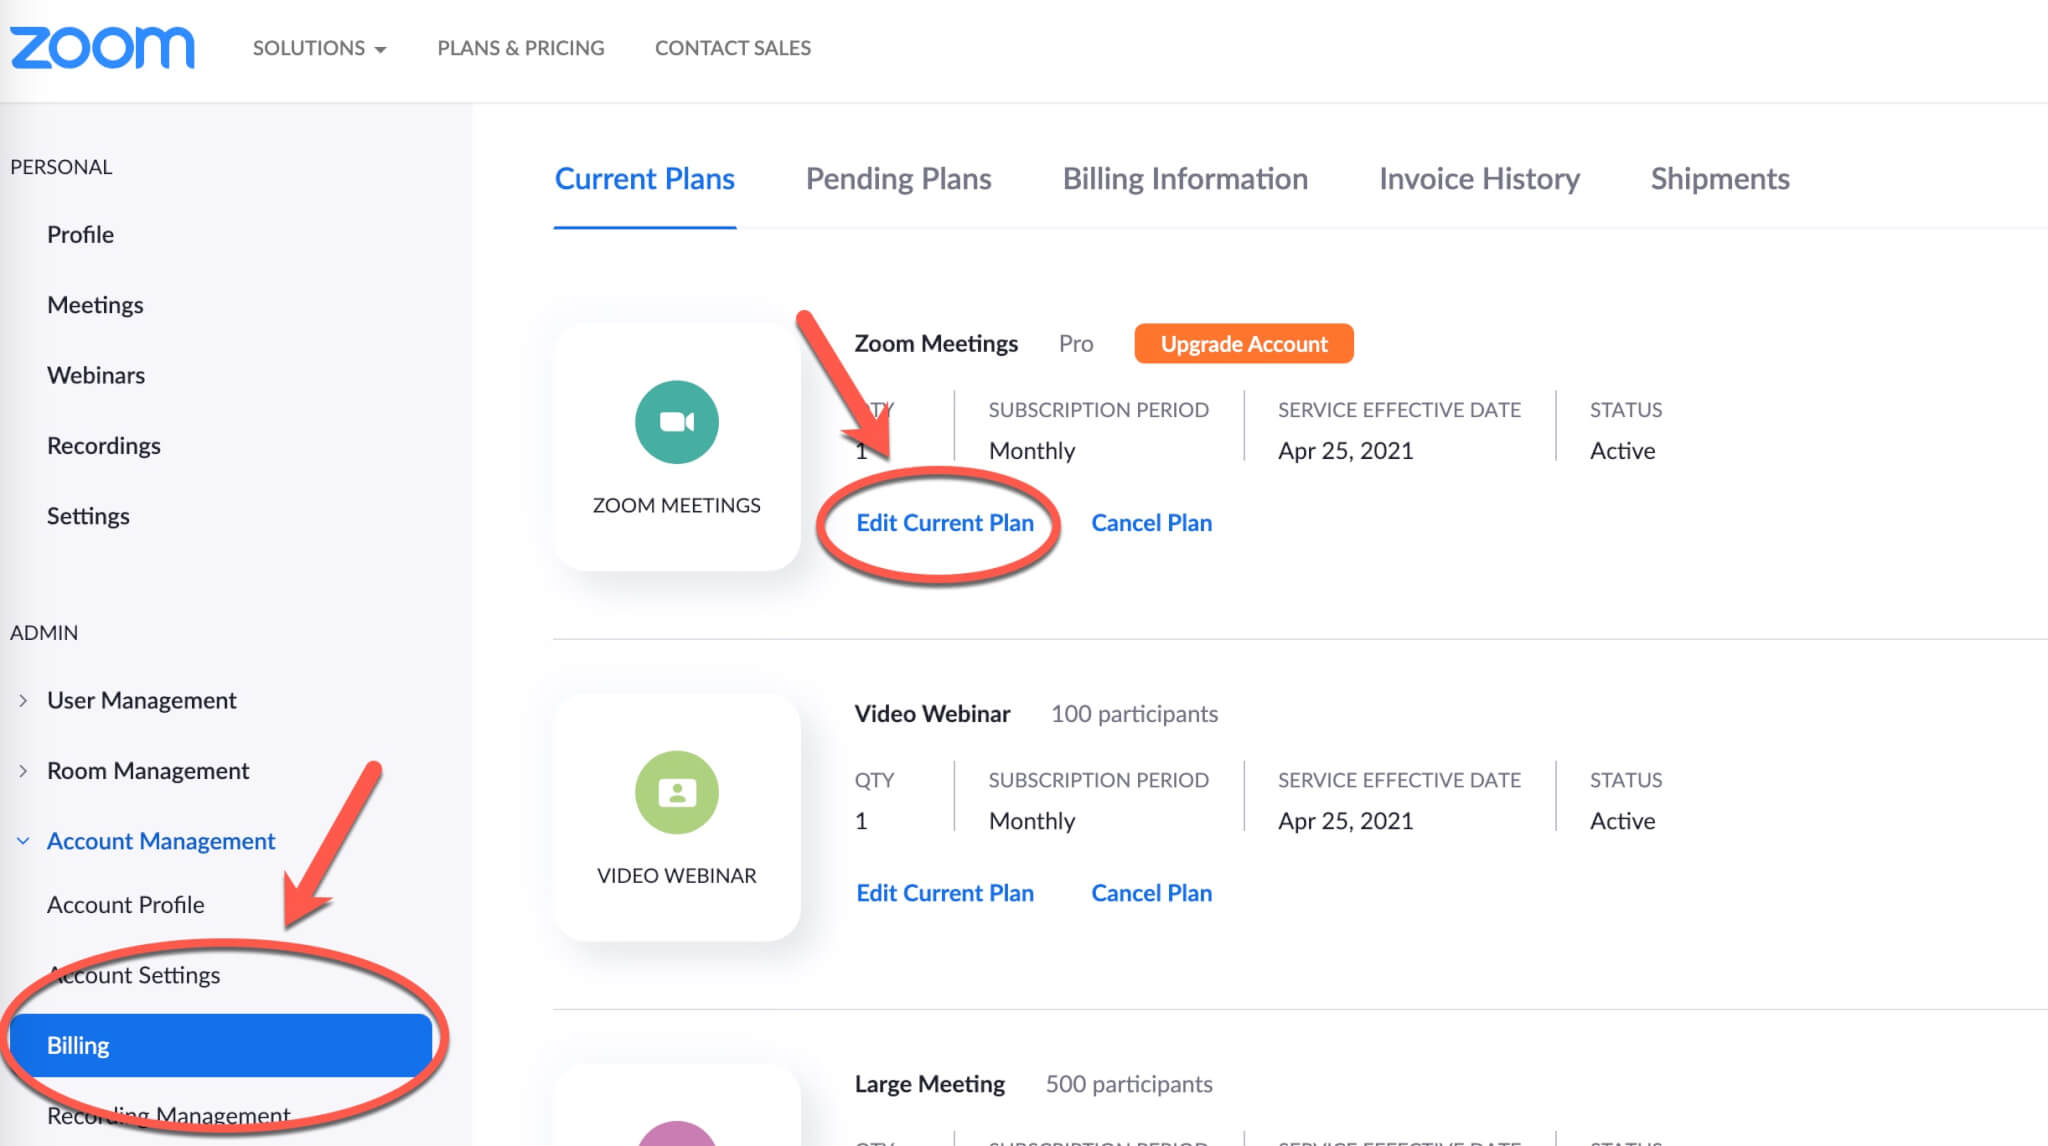
- Change the number of licenses and place the order.
- Assign the license to the other users (your cohosts) by following this link: https://support.zoom.us/hc/en-us/articles/115004976063
Recommended webinar settings
- Always set a passcode (or use the auto-generated one) to help avoid Zoom-bombers. Don’t worry – the invitation link automatically contains the encrypted passcode so it still only takes one click for the participants to join.

- You can set video to be off so you don’t show the video before fully prepared. You can always start the video any time.

- Use “Both” to make sure the audio works in either situation.

- For the interactions, Whova supports both Zoom and Whova interactions. But sometimes it can be confusing for the attendees if both are enabled. Many Whova customers choose to use Whova’s so the interactions can start before the session and continue after the session.
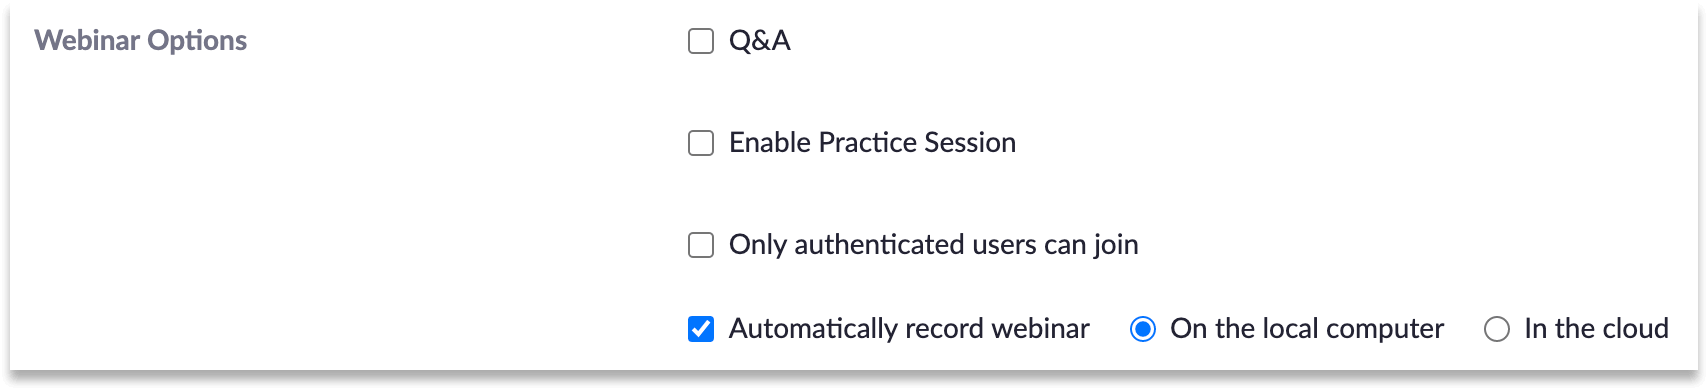
It’s also recommended to auto record the session so that you can later upload the video for replay.
Integrating the session into Whova
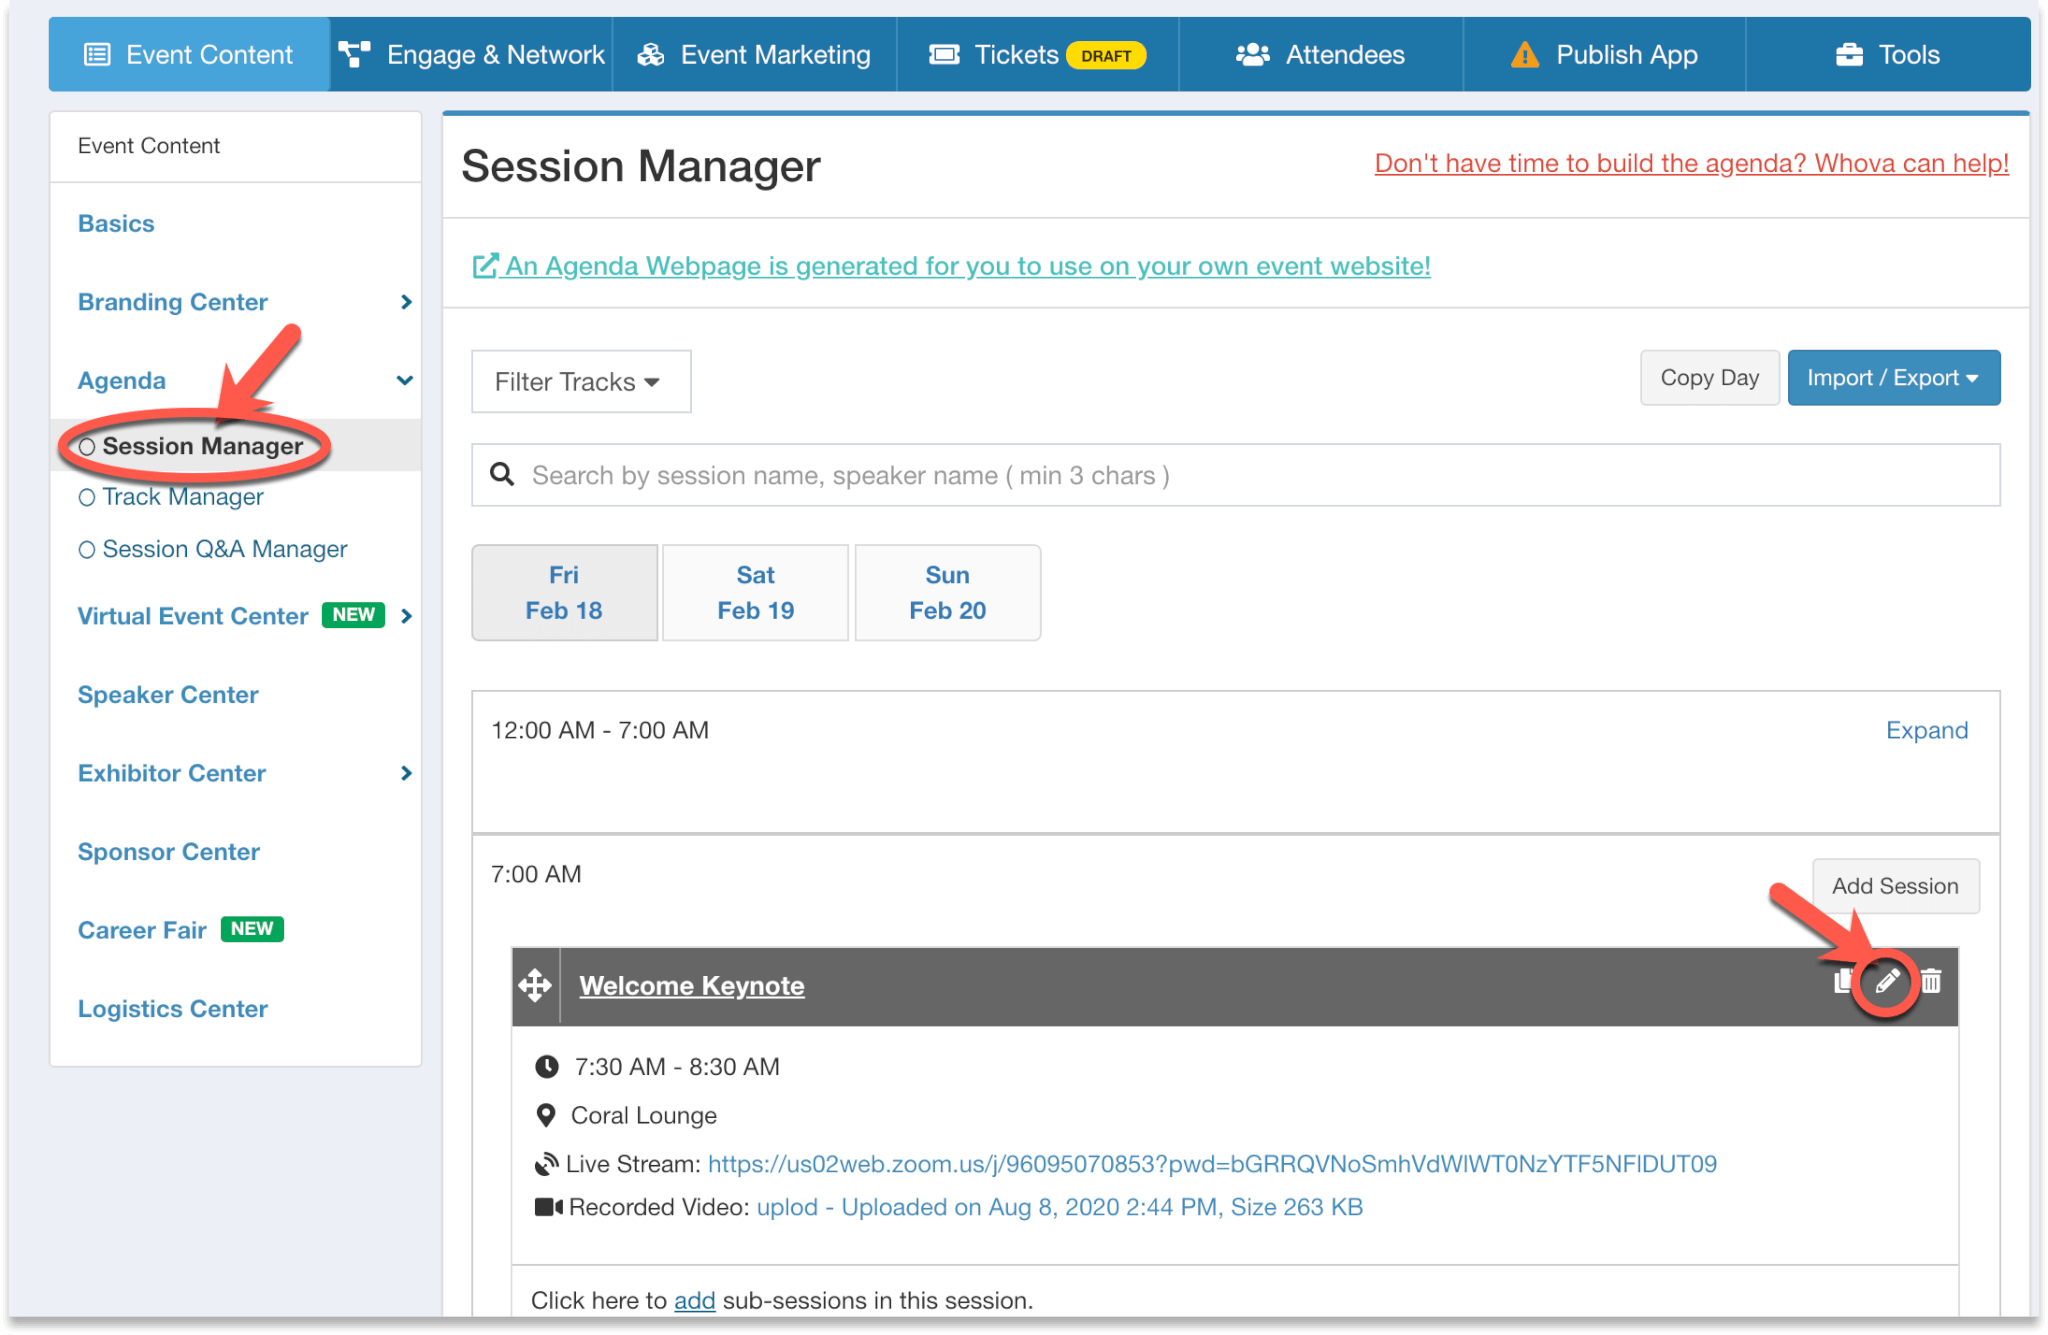
- Sign into Whova and access the Agenda tab on the left-hand side under Event Content. From there, choose Session Manager.
- Find the session you want to add the Zoom link, click the pencil icon to edit it.
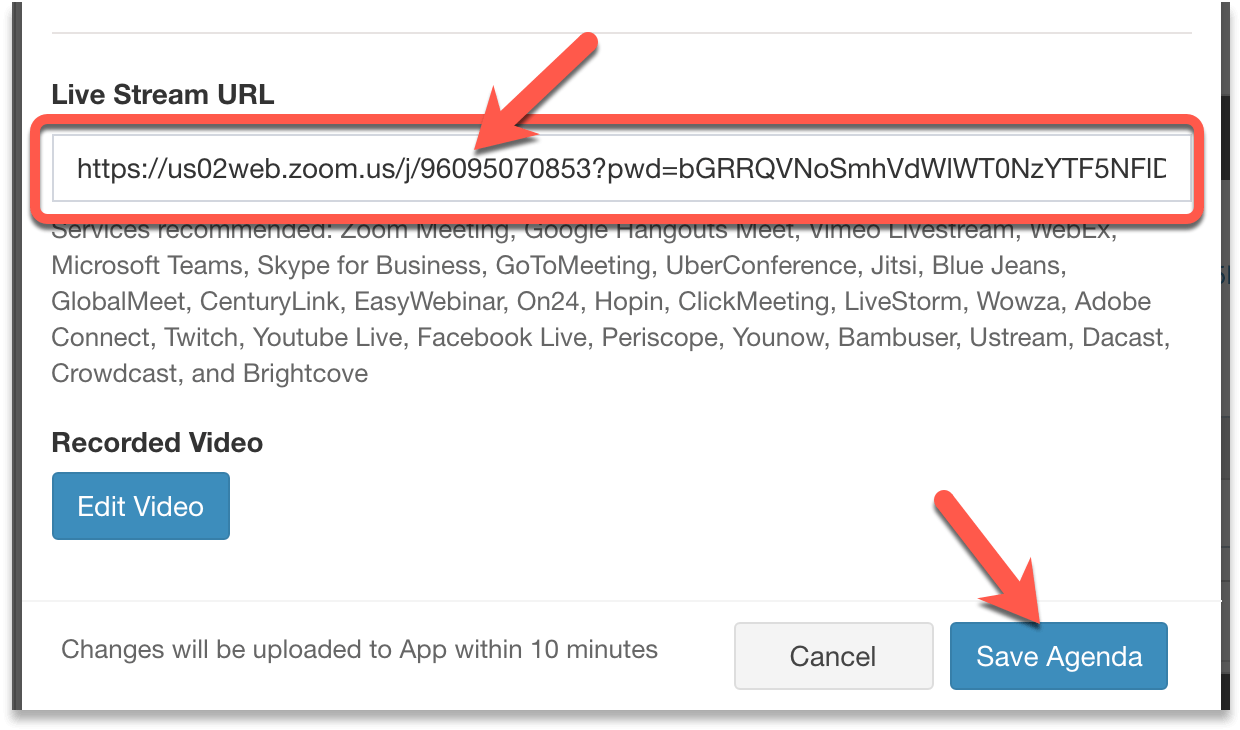
- On the pop-up, find Live Stream URL section and copy-paste the Zoom link.
- Click Save Agenda.
Connect Zoom account to directly create Zoom meetings in Whova
Now you can directly create Zoom meetings and webinars in Whova. It saves you from manually copying the meeting links from Zoom to Whova and prevents the copy-paste errors.
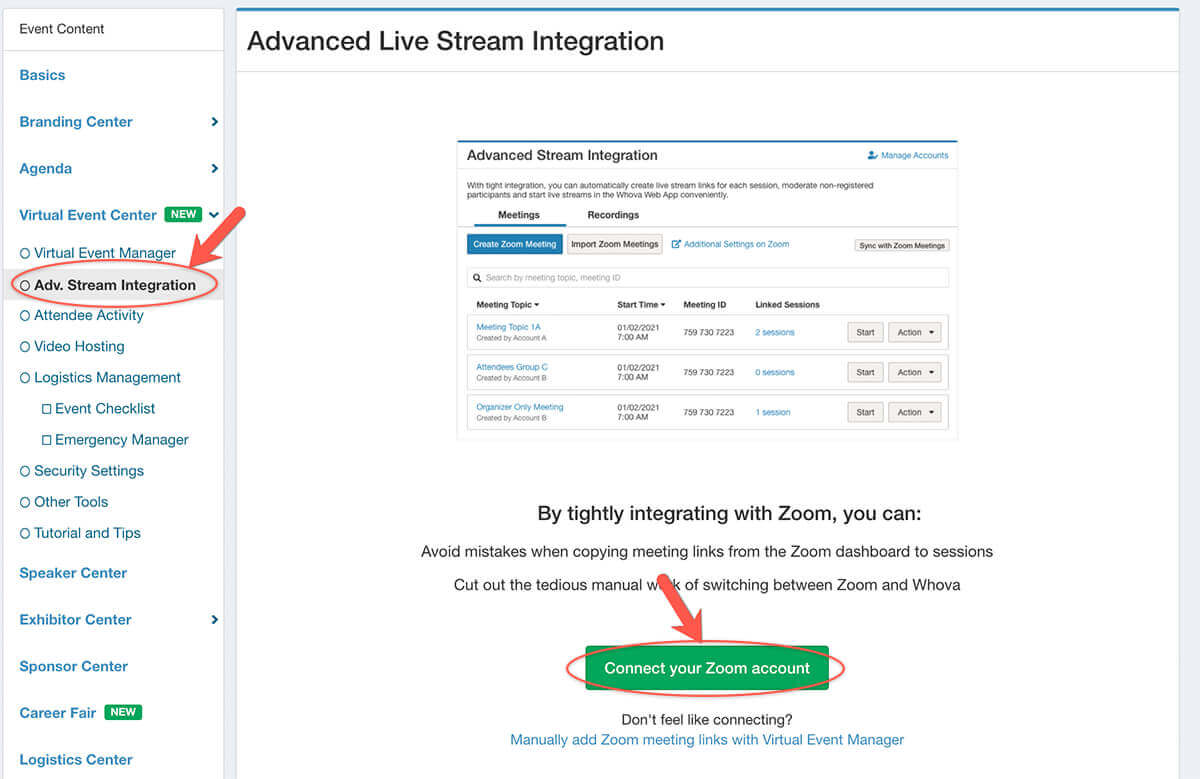
- On the dashboard, click Adv. Stream Integration on the side menu, and click Connect your Zoom account on the page
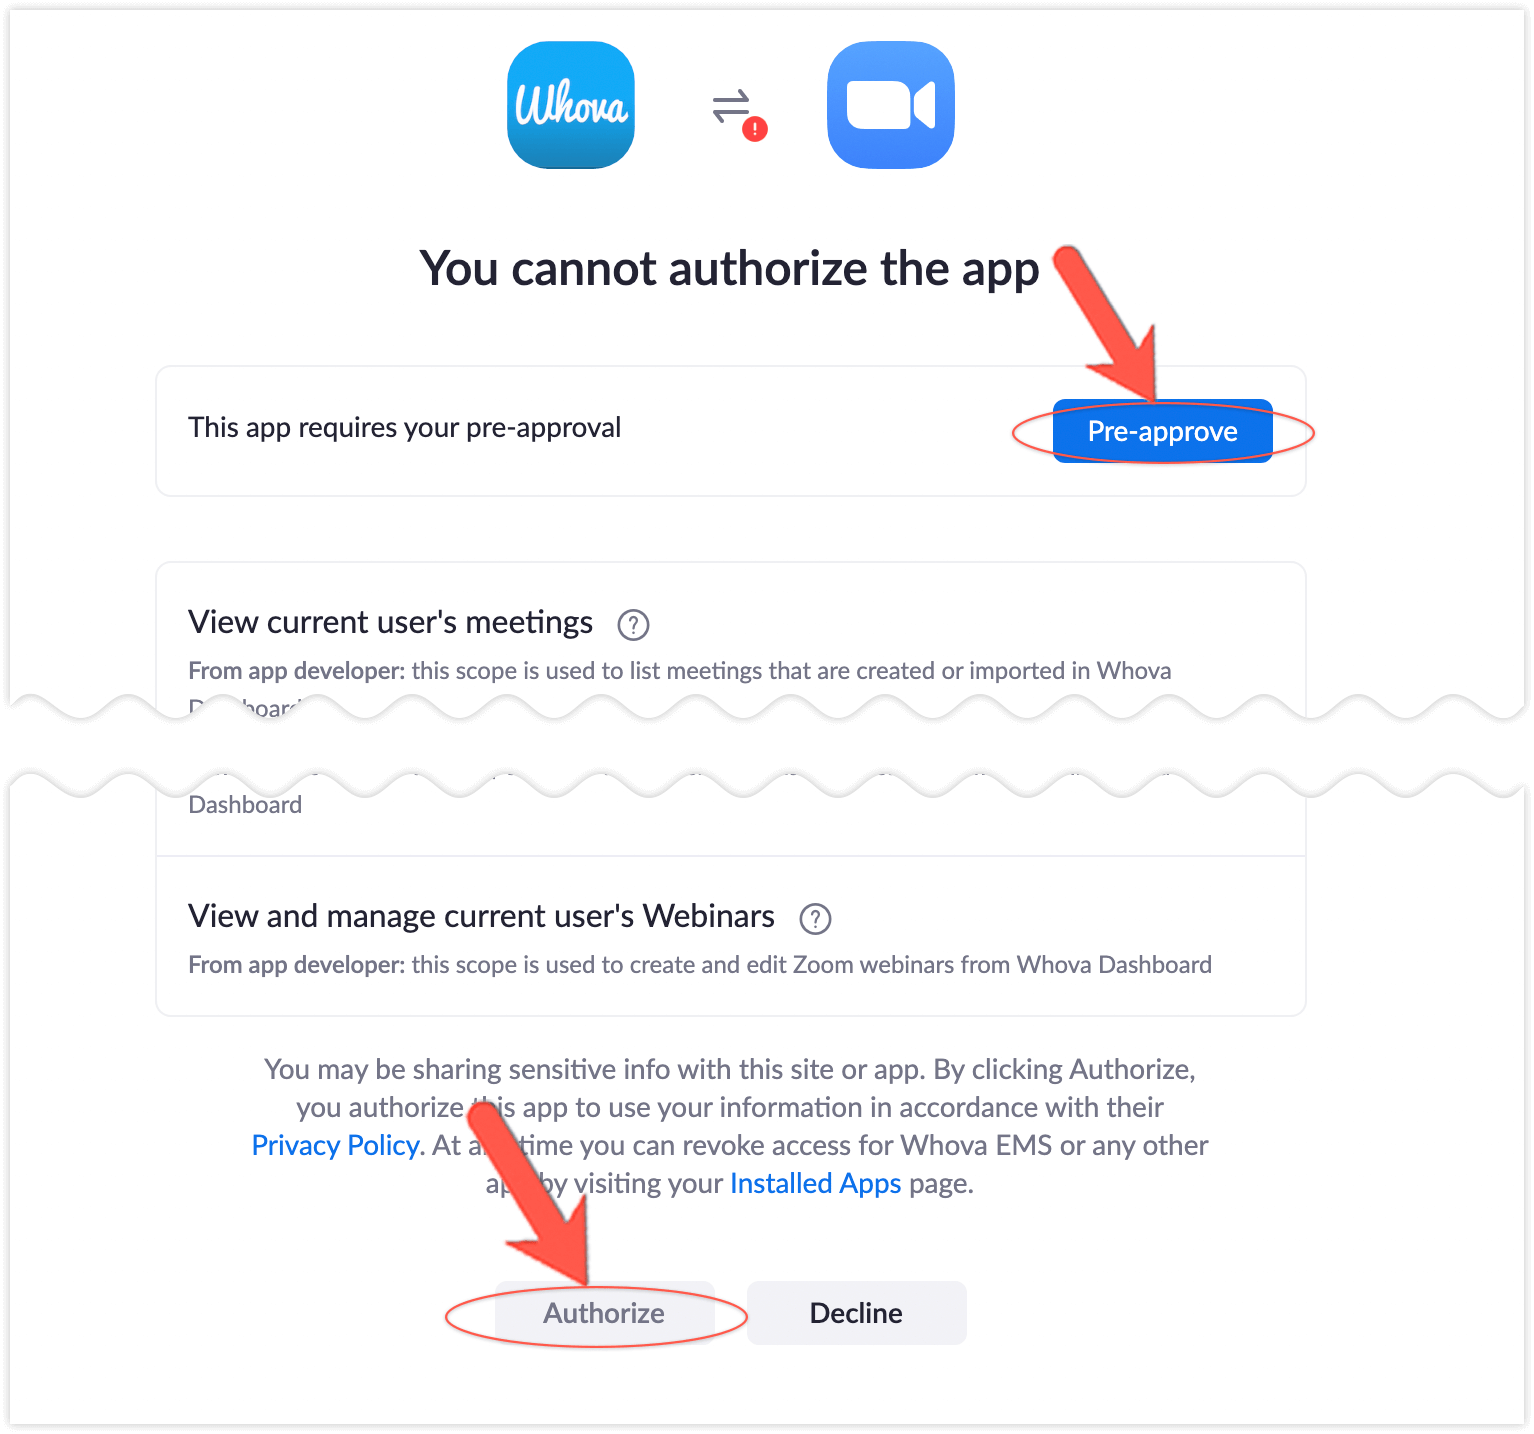
- Log in to your Zoom account on the popup dialogue, and click Pre-approve and Authorize.
- After authorization, click Create Zoom meeting button on the screen, select your account, and choose whether you want to create a meeting or a webinar. If you want to create a Zoom webinar, please make sure that you have purchased the webinar addon from Zoom.
If you already have some meetings created in Zoom, you can click Import Zoom meetings to import existing meetings.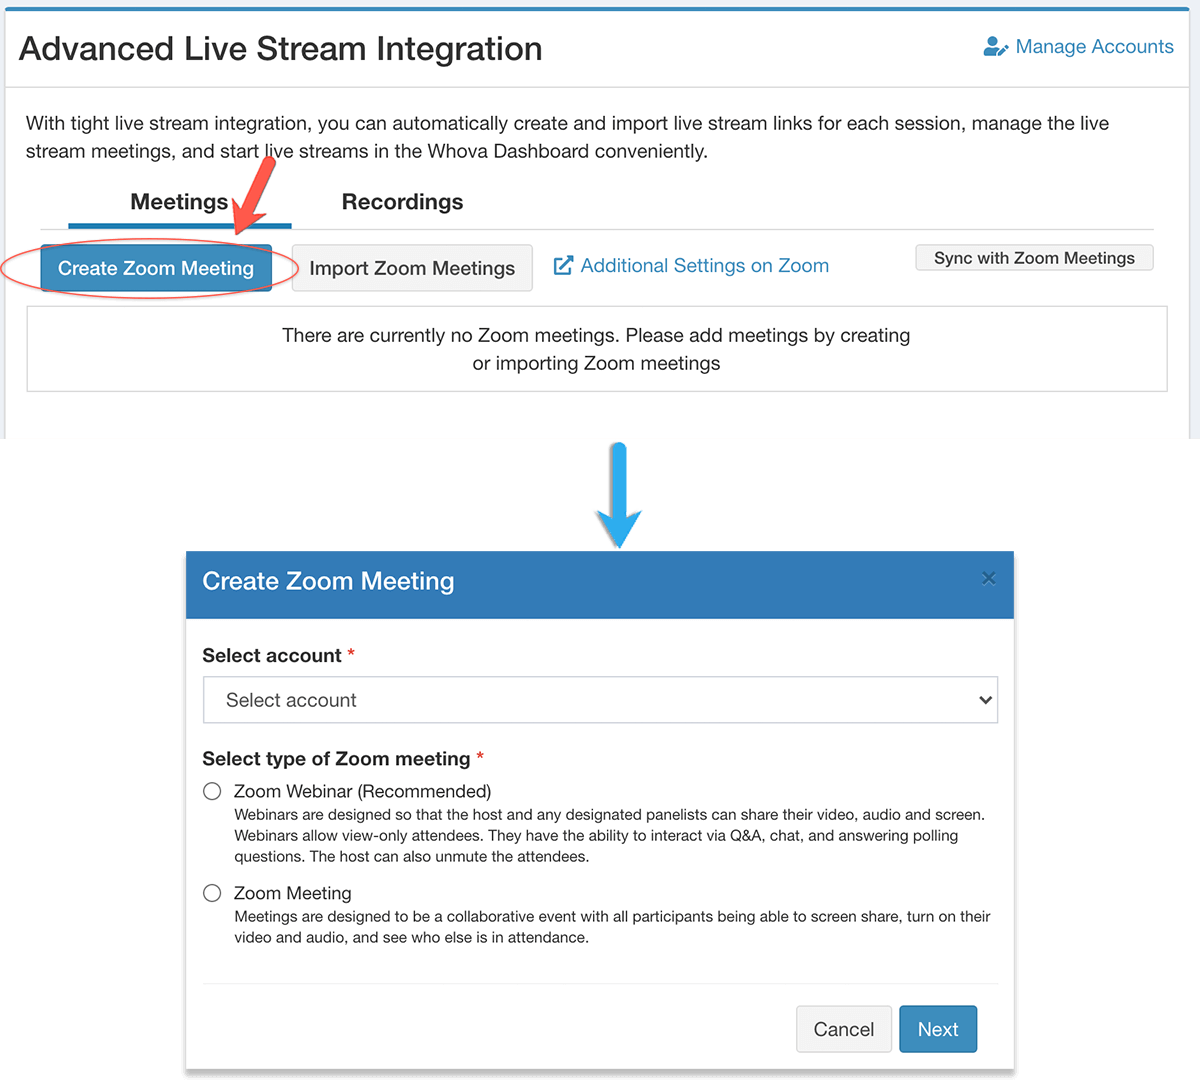
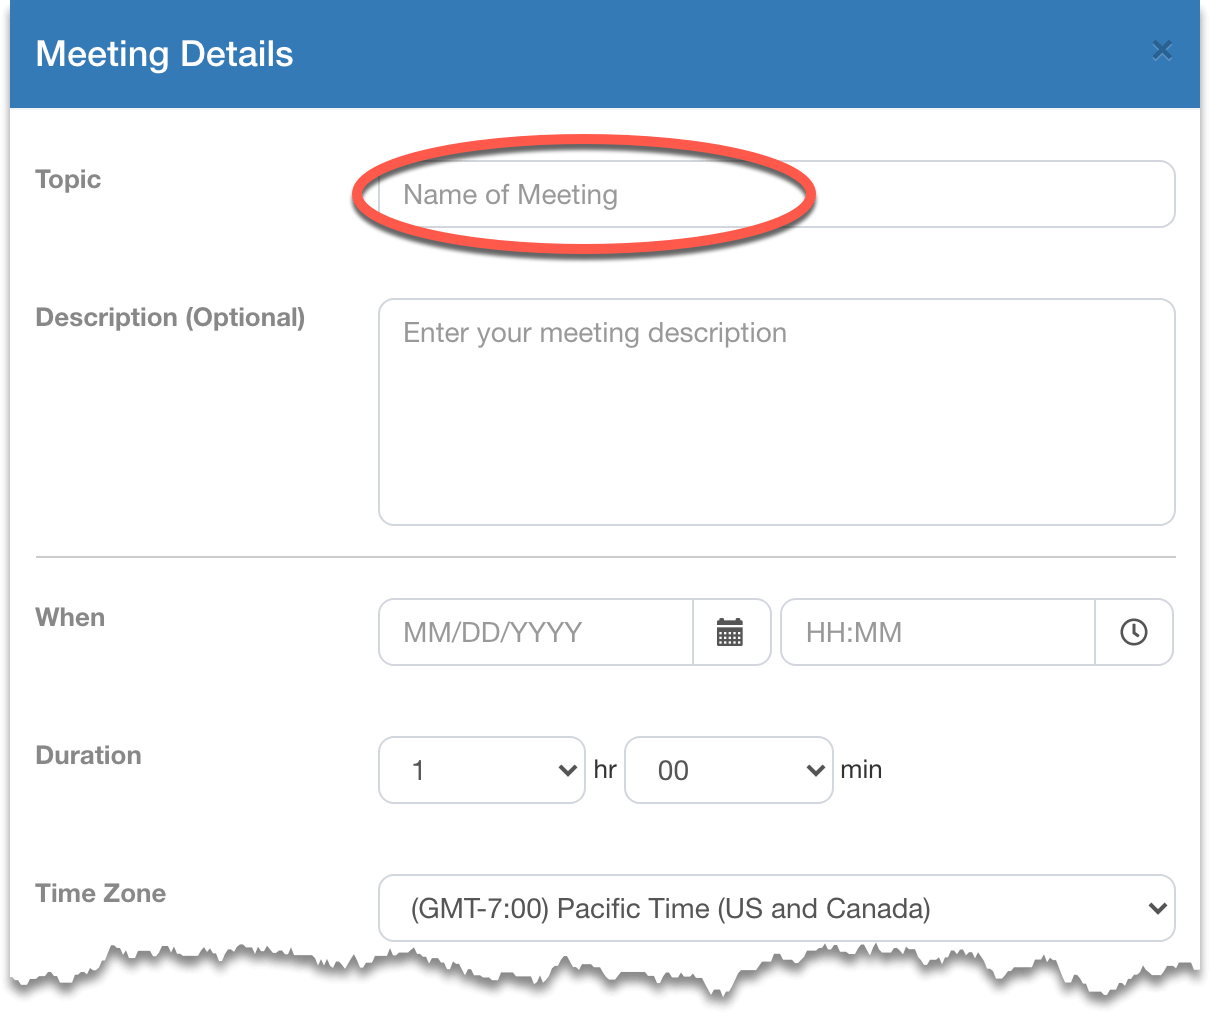
- Fill in the settings page the same as when you create on Zoom. Please make sure you have a meaningful name to the Topic field – later when you connect the meeting to the session, you can use this name to find the meeting instead of the meaningless meeting IDs. Click Create to create the meeting.
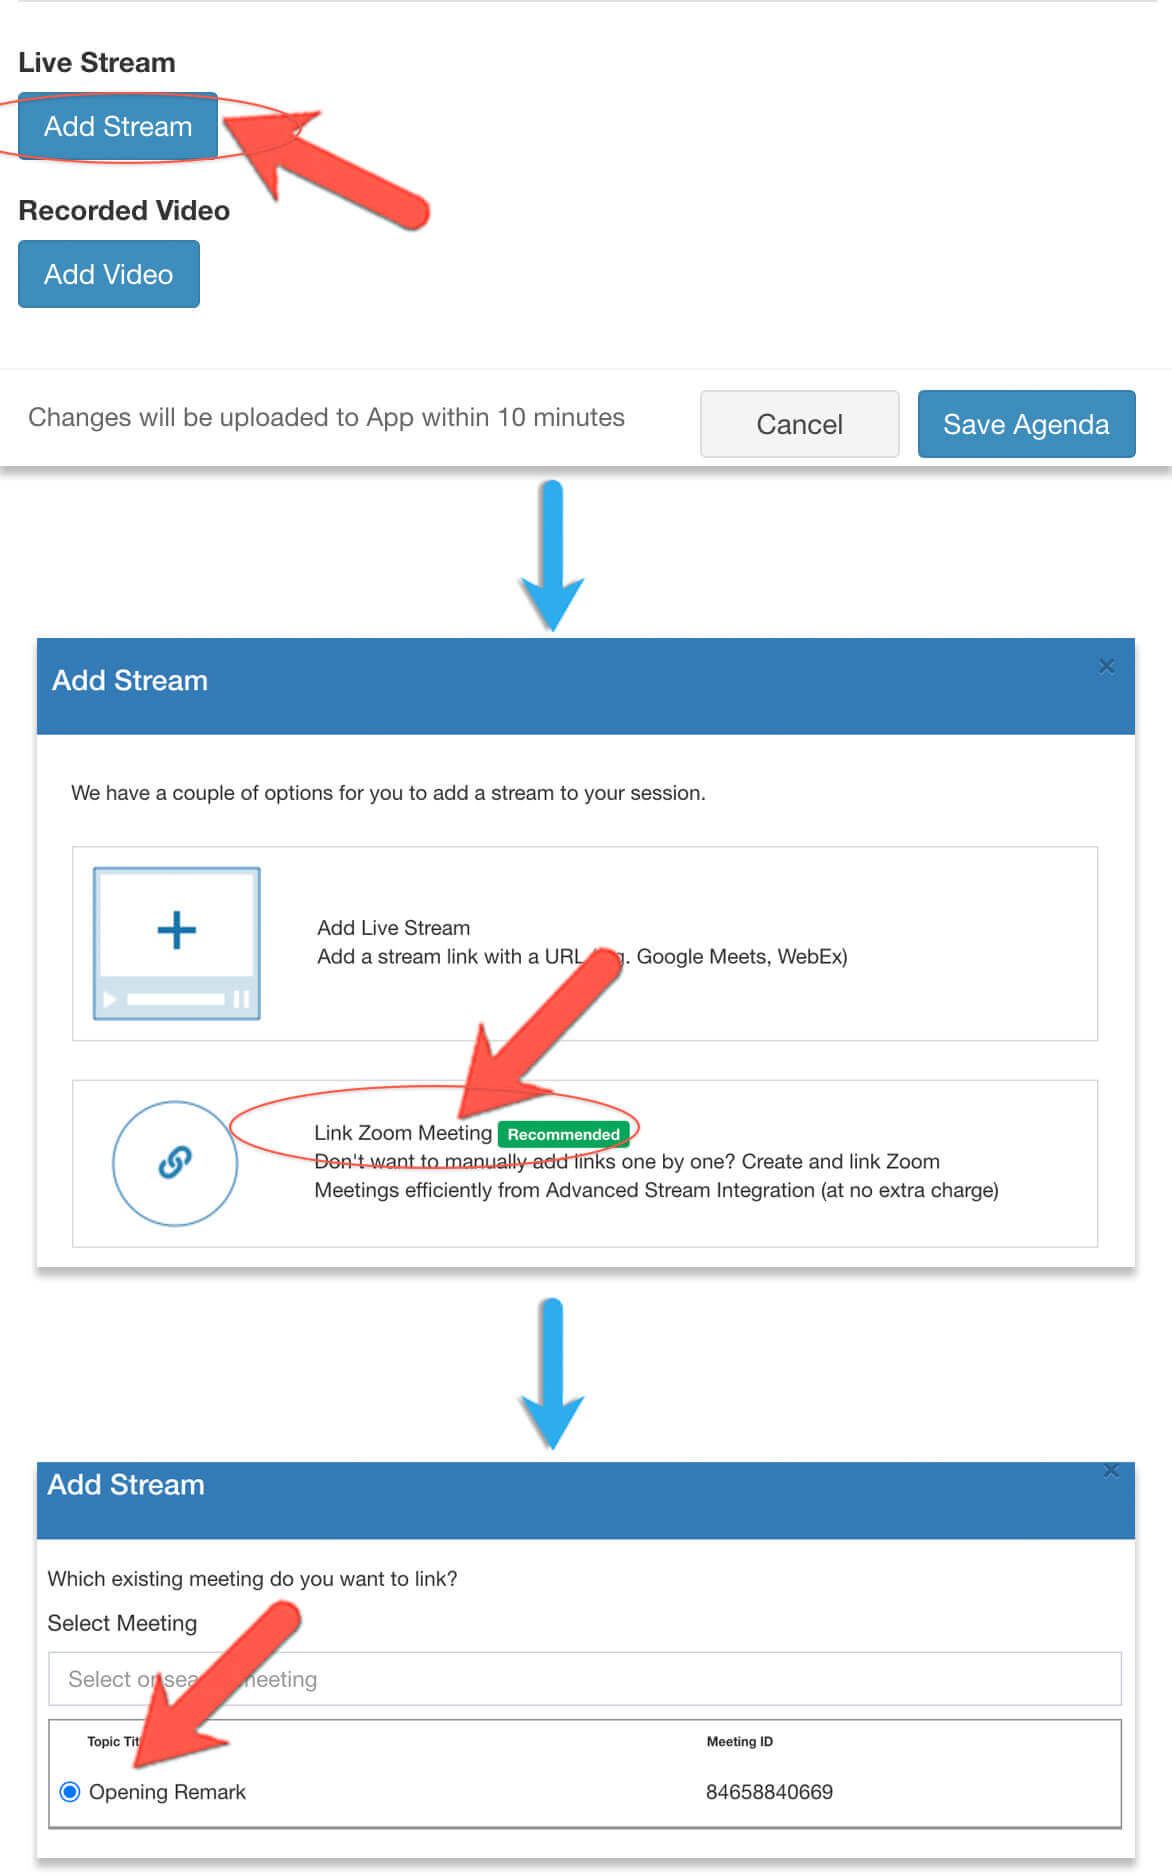
- After you’ve created all the meetings, go back to the Session Manager and click into the sessions to select the corresponding newly created Zoom meetings.
How to Make Sessions Accessible to Only Certain Attendees?
You can control
- when the sessions/videos are visible to the attendees so they won’t watch it ahead of time, and also avoid the links being shared before the events;
- what sessions are available to certain attendees such as VIP ticket holders;
- who can view the session recordings even after the live sessions