May 30, 2025
As an event organizer, you often need to group attendees for all kinds of internal logistics—like who has dietary restrictions, who signed up for the airport shuttle, who needs accessibility accommodations, who signed up for an excursion, or who has paid for the banquet.
Creating these special attendee lists helps you stay organized, makes it easier to coordinate with caterers and transportation vendors, and ensures people get access to exactly what they signed up for—no mix-ups, no missed meals, no left-behind VIPs.
All this valuable info—like banquet sign-ups, dietary restrictions, shuttle requests, and more—usually comes straight from your registration data. Some details are add-ons attendees purchase (like banquets or tours), while others come from form responses (like dietary needs or accessibility requests).
But let’s be honest—manually exporting each list, keeping them updated, and making sure last-minute registrants aren’t left out? That can get messy fast. One missed update and someone’s going hungry or stranded without a shuttle. Not ideal!
Managing internal attendee groups shouldn’t be this complicated. That’s why Whova’s Attendee Segments feature lets organizers categorize attendees based on registration information, such as add-on purchases or registration question responses, and communicate with target groups seamlessly.
Unlike attendee categories, segments are only visible to organizers—they won’t appear in attendee profiles within the event app. In other words, attendee segments are your behind-the-scenes tool for organizing, communicating, and managing logistics.
With attendee segments, you can do the following easily:
- Send targeted announcements to specific attendee segments like those who purchased banquet tickets, transportation, workshops, or indicated dietary restrictions—no manual sorting needed.
- Add helpful labels to name badges using abbreviations like “VEG” for vegetarians or “BUS” for shuttle riders, “DIN” for banquet dinners, “WOR” for workshops, making on-site check-ins and access control a breeze.
- Easily export attendee segments to share with catering teams, shuttle providers, or other organizers—so everyone’s in the loop and nothing gets missed.
Please note that this feature is ONLY available for customers who use Whova registration for their events.
Let’s dive into everything you need to know about this new feature!
Where to Find Attendee Segments
To use attendee segments, you’ll need to be using Whova registration. Here’s how to access them:
- Go to the Attendees tab at the top of your event dashboard.
- Click Attendee Segments on the left-hand side.
- If you haven’t set up Whova registration, you’ll be prompted to do so.
Once enabled, when your registrations flow in, your segments will automatically appear based on your registration settings, and you can start using them right away.
Automatically Sort Attendees into Private Segments
One of the most helpful and time-saving features of attendee segments is that they’re automatically created based on your registration setup. That means you don’t need to manually assign attendees to different segments. Instead, they’re sorted into segments and subsegments as they register.
There are two ways segments are created automatically:
Add-Ons
If an attendee purchases an add-on when registering, Whova creates a segment based on that item and subsegments based on the options they chose.
For example, if someone buys a T-shirt as an add-on, you’ll see:
- Segment: T-shirt Purchase
- Subsegments: Small, Medium, Large, XL
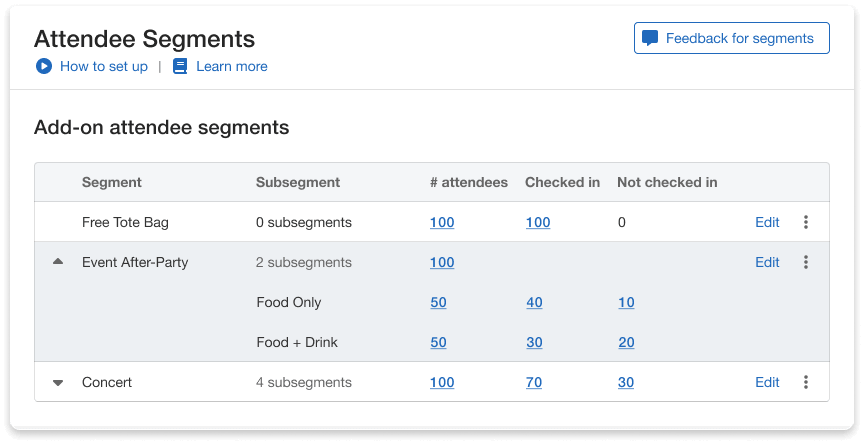
Segments and subsegments are automatically created from add-ons.
This makes it easy to track inventory, prepare the right shirt sizes for pickup, and eliminate the need for a separate list.
These segments and subsegments are also helpful for organizers offering other types of ticket add-ons, such as access to an event after-party, workshops, exclusive merchandise, VIP upgrades, or parking passes.
For example, if an attendee purchases a workshop add-on and selects a specific topic—such as “AI” or “Marketing”—organizers can segment attendees based on their selection and include that information on name badges, making it easy to verify access at the workshop entrance.
Registration Questions
If you choose to use the Whova registration form, two optional default question topics can be used to create attendee segments: dietary restrictions and transportation needs.
If you include the question “Dietary restrictions?” the following segment and subsegments will be created:
- Segment: Do you have any dietary restrictions?
- Subsegments: Vegetarian, Vegan, Gluten-Free, Dairy-Free, Nut-Free, Other
The other optional default question to add asks attendees if they require transportation to the event. This question is customizable, so you can rephrase the copytext based on how you are providing transportation for attendees.
For example, if your event offers transportation from a nearby airport to the conference hotel, you can customize the question to say, “Do you need to take the conference shuttle from San Francisco Airport to the Conference Hotel?” Similarly, if you are providing a shuttle service from the event venue back to the hotels, you can adjust the question accordingly to ensure attendees clearly understand the option.
Attendees will answer yes or no–if they select yes, they will automatically be put into a segment titled “Need Transportation.”
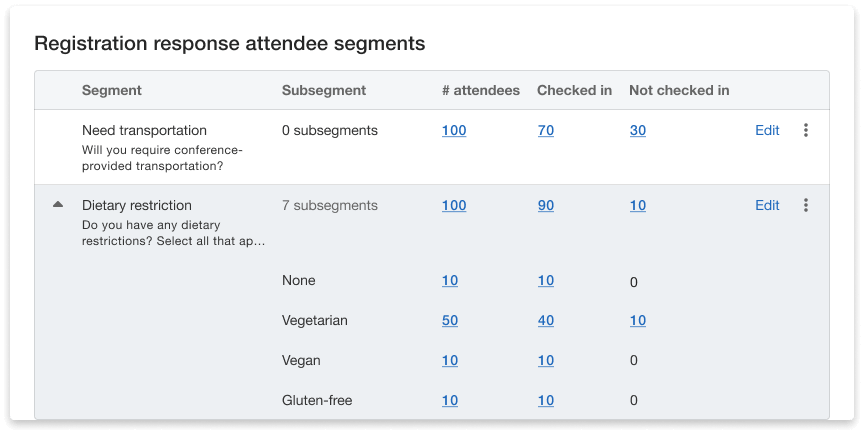
Answers from two default questions determine which segment and subsegments attendees will belong to.
How to Edit Segment and Subsegment Names
For better readability, you can edit the names of both segments and subsegments created from Registration Questions or Add-ons by clicking “Edit” next to the segment you want to modify. This will open a modal where you can update the names through text boxes.
The current segment name will appear at the top of the modal and can be updated by editing the text field. If your segment is labeled “Need Transportation”, but you’d like to change it to “Shuttle,” simply click on the text field and enter the new name.
All associated subsegment names will be listed below, and each one can be edited directly in its respective field. For instance, if you’re selling an add-on to multiple workshops, a subsegment is created for each one, such as “Workshop: AI in Healthcare”. You can shorten the name by clicking the text field and updating it to “AI”, for example.
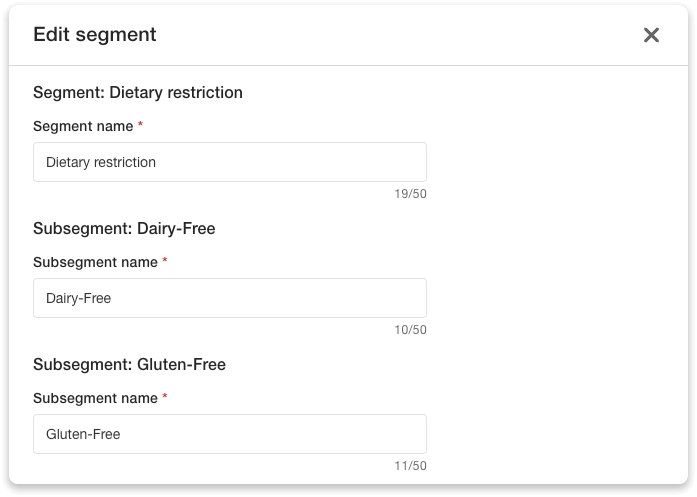
Edit subsegment names and abbreviations to easily identify needs of attendees.
View and Export Segment Lists with Just a Few Clicks
Once attendees are sorted into segments, organizers can easily view and export lists from the attendee segment dashboard.
Click the three dots next to any segment to view a list of attendees and their subsegment. You can filter by:
- Subsegment (e.g. only vegans)
- Check-in status (e.g. only those who have already checked in)
This is especially helpful for coordinating with third-party services. You don’t have to spend hours digging through registration data or manually compiling lists. Instead, you can quickly export this information and send it to vendors as needed. For example:
- You can export a list of attendees with dietary restrictions to give to your caterer, including what each person needs.
- You can export all attendees who said they would use the shuttle service, and send that list to your transportation team.
Whether you’re printing materials, preparing meals, or managing logistics, you’ll have the info you need ready to share.

View and export attendees by their segment, subsegment, and if they have checked-in.
Send Targeted Announcements to Segments
Attendee segments also streamline how you communicate with attendees. From the segment dashboard, you can create and send targeted announcements to certain segments or subsegments, and for each you can further filter by check-in status.
This ensures the right messages go to the right people without overloading others with irrelevant updates. For example, for those who registered for vegetarian meals, you can send a message to them telling them where to pick up their meal. Or, for those who registered for a shuttle service, you can send a message telling them when the shuttle comes, where to meet, and what to look for.
You can create announcements from scratch, use a saved template, or repurpose a previous message.
If you prefer to send announcements from the main Whova app or the announcements tab, that’s also an option, but note that those announcements can only be sent by segment (not subsegment) and can’t be filtered by check-in status.
When you need to quickly and easily send out updates, like messaging everyone with any kind of dietary restriction or all attendees using special accommodations, attendee segments make it simple.
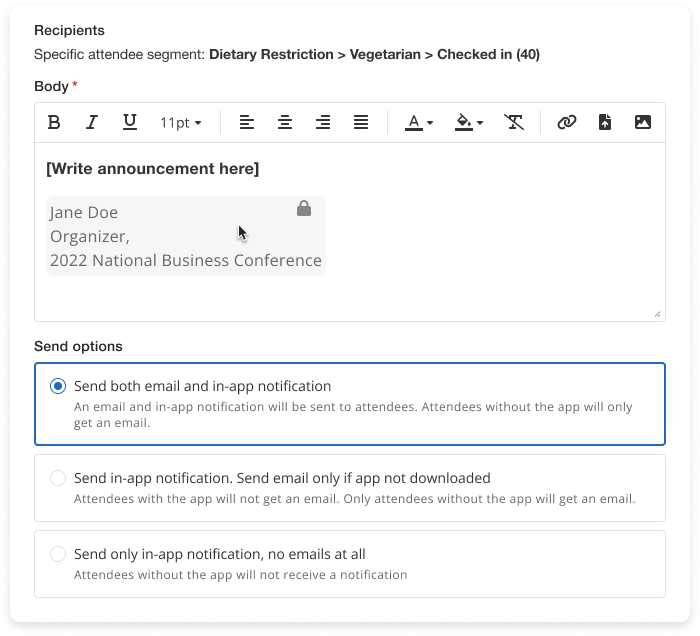
Send announcements to select attendees by segments, subsegments, and check-in data.
Add Segment Labels to Name Badges for Quick Identification
Whether it’s event staff distributing special meals or check-in staff verifying workshop registrations, attendee segment labels on name badges make it easy to identify attendees at a glance.
Using Whova’s name badge editor, you can add up to three segments to attendee name badges. Depending on the segment or subsegment the attendee belongs to, you can create abbreviations to show the information in the name badge to save space.
For example:
- VEG: Vegetarian
- WS: Registered for Workshop
This makes it easier for staff and vendors to quickly identify attendees’ needs and route them accordingly. For example, meal servers can confirm dietary needs at a glance, and door greeters at the workshop can verify that attendees are registered for the session.
Here’s how to add these segments to attendee name badges:
- Go to the Attendees tab in Whova.
- Open the Name Badge Editor.
- On the right-hand panel, click Add Segment.
- Select the segment you want to add.
- If the selected segment has no subsegments (e.g., needs transportation), enter an abbreviation in the text field to create a label.
- If the selected segment has subsegments (e.g., dietary restrictions), create labels by typing abbreviations for each subsegment in the text fields provided.
Once your segment is added, you will see it under Added Segments and can proceed to add up to three segments to display on badges.
Even after creating the segments, you can can make changes to the labels:
- Choose the segment from Added Segments and click Edit.
- Make changes to the created labels by editing the abbreviations.
- Click Save to preserve the changes.
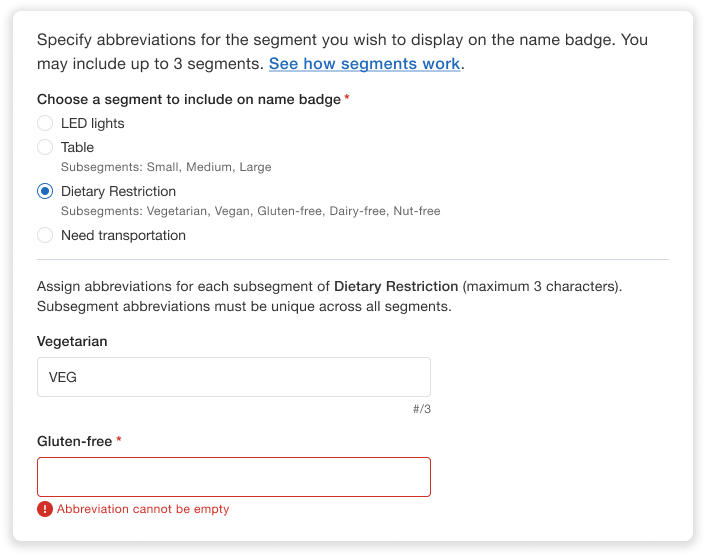
Add up to 3 labels to include on attendee name badges.
Take Control of Internal Event Organization Without Excessive Manual Work
With private attendee segments, you no longer need to rely on manual tracking or external spreadsheets to manage event logistics. Now, you can:
- Privately categorize attendees automatically
- Communicate more efficiently by only sending messages to relevant attendees
- Ensure accommodations are delivered smoothly
- Print useful labels on name badges to help staff quickly identify dietary needs, workshop signups, and more
- Export attendee lists by segment to easily coordinate with caterers, shuttle services, or other vendors
Whether you’re organizing a small workshop or a multi-day conference, attendee segments give you more flexibility and control without creating more work for you or your team. Start using attendee segments today and make internal organization one less thing to worry about.
Want to see Whova registration in action? Get a personalized quote today.