June 29, 2026
Building an event agenda often means coordinating information from multiple sources, managing last-minute updates, and handling hundreds of sessions. But the last thing organizers need is extra administrative work just to get their program into the event platform.
That’s why we’ve been continuously improving Whova’s agenda setup experience to help organizers save time and get their events ready faster.
Over the past several months, we’ve introduced a number of enhancements designed to simplify the process. Organizers can now manage submissions and accepted content through Whova’s Abstract Management System (call for speakers), including recently added admin notes for internal collaboration. We’ve also expanded integrations with academic review platforms like OpenReview and HotCRP, allowing accepted submissions to flow more easily into the Agenda Center.
Once sessions are in Whova, we’ve continued streamlining agenda management with time-saving editing tools. Organizers can quickly swap sessions, schedule multiple sessions back to back, and take bulk actions, such as bulk assigning rooms, tags and tracks. Together, these improvements help reduce tedious manual work so organizers can build and refine their agenda more efficiently.
More recently, we introduced Session List Import, allowing organizers to upload session information using a Whova import template and quickly start building their agenda.
Each improvement has had the same goal: reducing manual work so organizers can spend less time preparing data and more time creating a great event experience.
Today, we’re taking another step forward with Custom Session List Import.
Many organizers already have their session information neatly organized in Excel, Google Sheets, or exported reports from other systems. Previously, they often had to copy data into Whova’s import template before uploading it. While faster than manual entry, it still required additional preparation.
With Custom Session List Import, that’s no longer necessary.
Simply upload your existing spreadsheet and match your current columns to Whova fields such as Session Title, Description, Speakers, Tracks, Locations, Session Type, and more. Whova will import the sessions using the structure you’ve already created.
No rebuilding spreadsheets. No copy-and-paste exercises. No unnecessary reformatting.
Custom Session List Import helps organizers:
- Save valuable setup time: Import the spreadsheet you already have instead of reorganizing it to fit a predefined template.
- Reduce repetitive work: Eliminate the extra step of moving information between files.
- Minimize errors: Fewer manual edits mean fewer opportunities for mistakes.
- Get your agenda published sooner: Spend more time fine-tuning your program and less time preparing data for import.
Setting up an agenda shouldn’t feel like a project of its own. Whether you’re using Whova’s Abstract Management System, OpenReview, HotCRP, our Session List Import template, or your own carefully maintained spreadsheet, we’re committed to helping you build your agenda with the least amount of effort possible.
Upload Your Own Custom Spreadsheet
To get started, go to the Content tab and open the Agenda Center. Then, navigate to the Session Manager.
From there, choose to import your session list without times. You can find this option on the initial agenda setup page or through the Import dropdown.
You’ll then see two options for bringing in your session data:
- Use Whova’s Excel template
- Upload your own spreadsheet (.xlsx or .csv)
If you already have your own spreadsheet ready to go, select the option to upload your own.
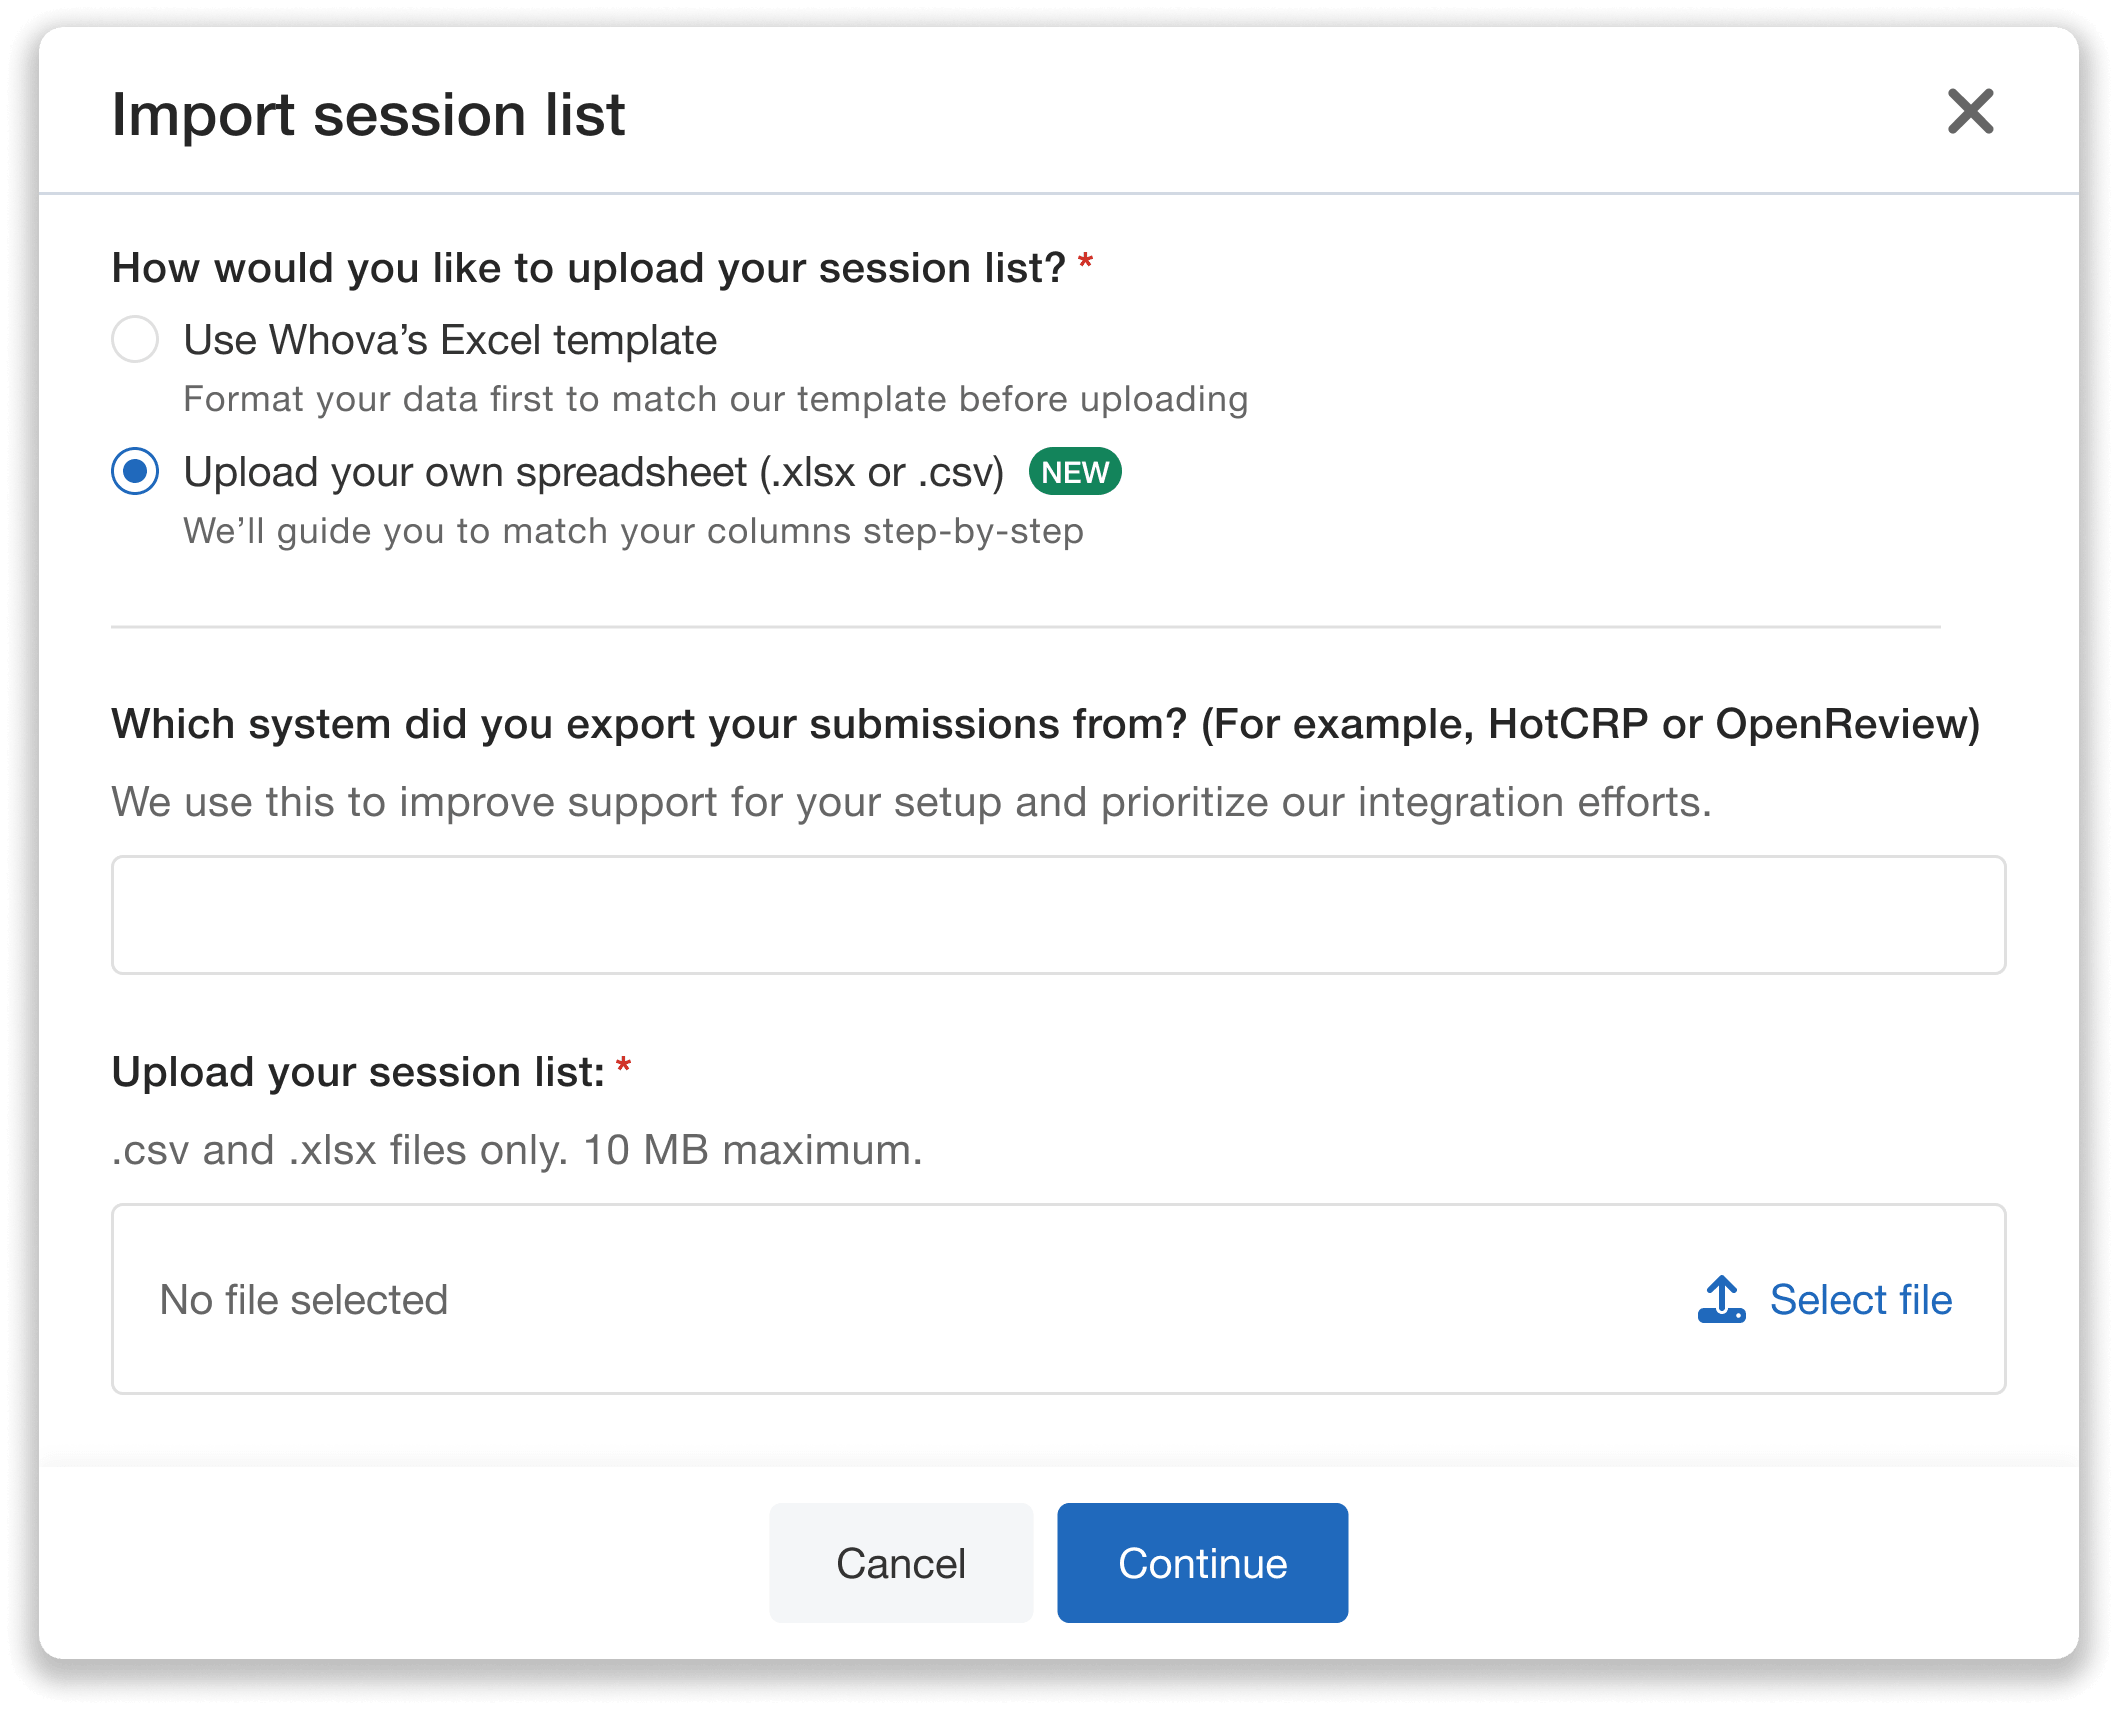
Upload your own session list spreadsheet directly to Whova.
We’ll ask you to identify which system your submissions were exported from (for example, OpenReview). This helps us better support common workflows and prioritize future integration efforts.
Finally, upload your session list file in either .xlsx or .csv format, and continue to the next step to begin mapping your columns to Whova fields.
Quickly Map Your Data to Whova Fields
Once you upload your file, Whova will read your spreadsheet and display a preview of its contents.
The first step is to select the row that contains your column headers (for example, “Session Title” or “Speaker”). Make sure you select the header row rather than the actual data.
Next, you’ll map each column in your spreadsheet to a corresponding Whova field. For each column, open the “Map header” dropdown and choose what that column represents.
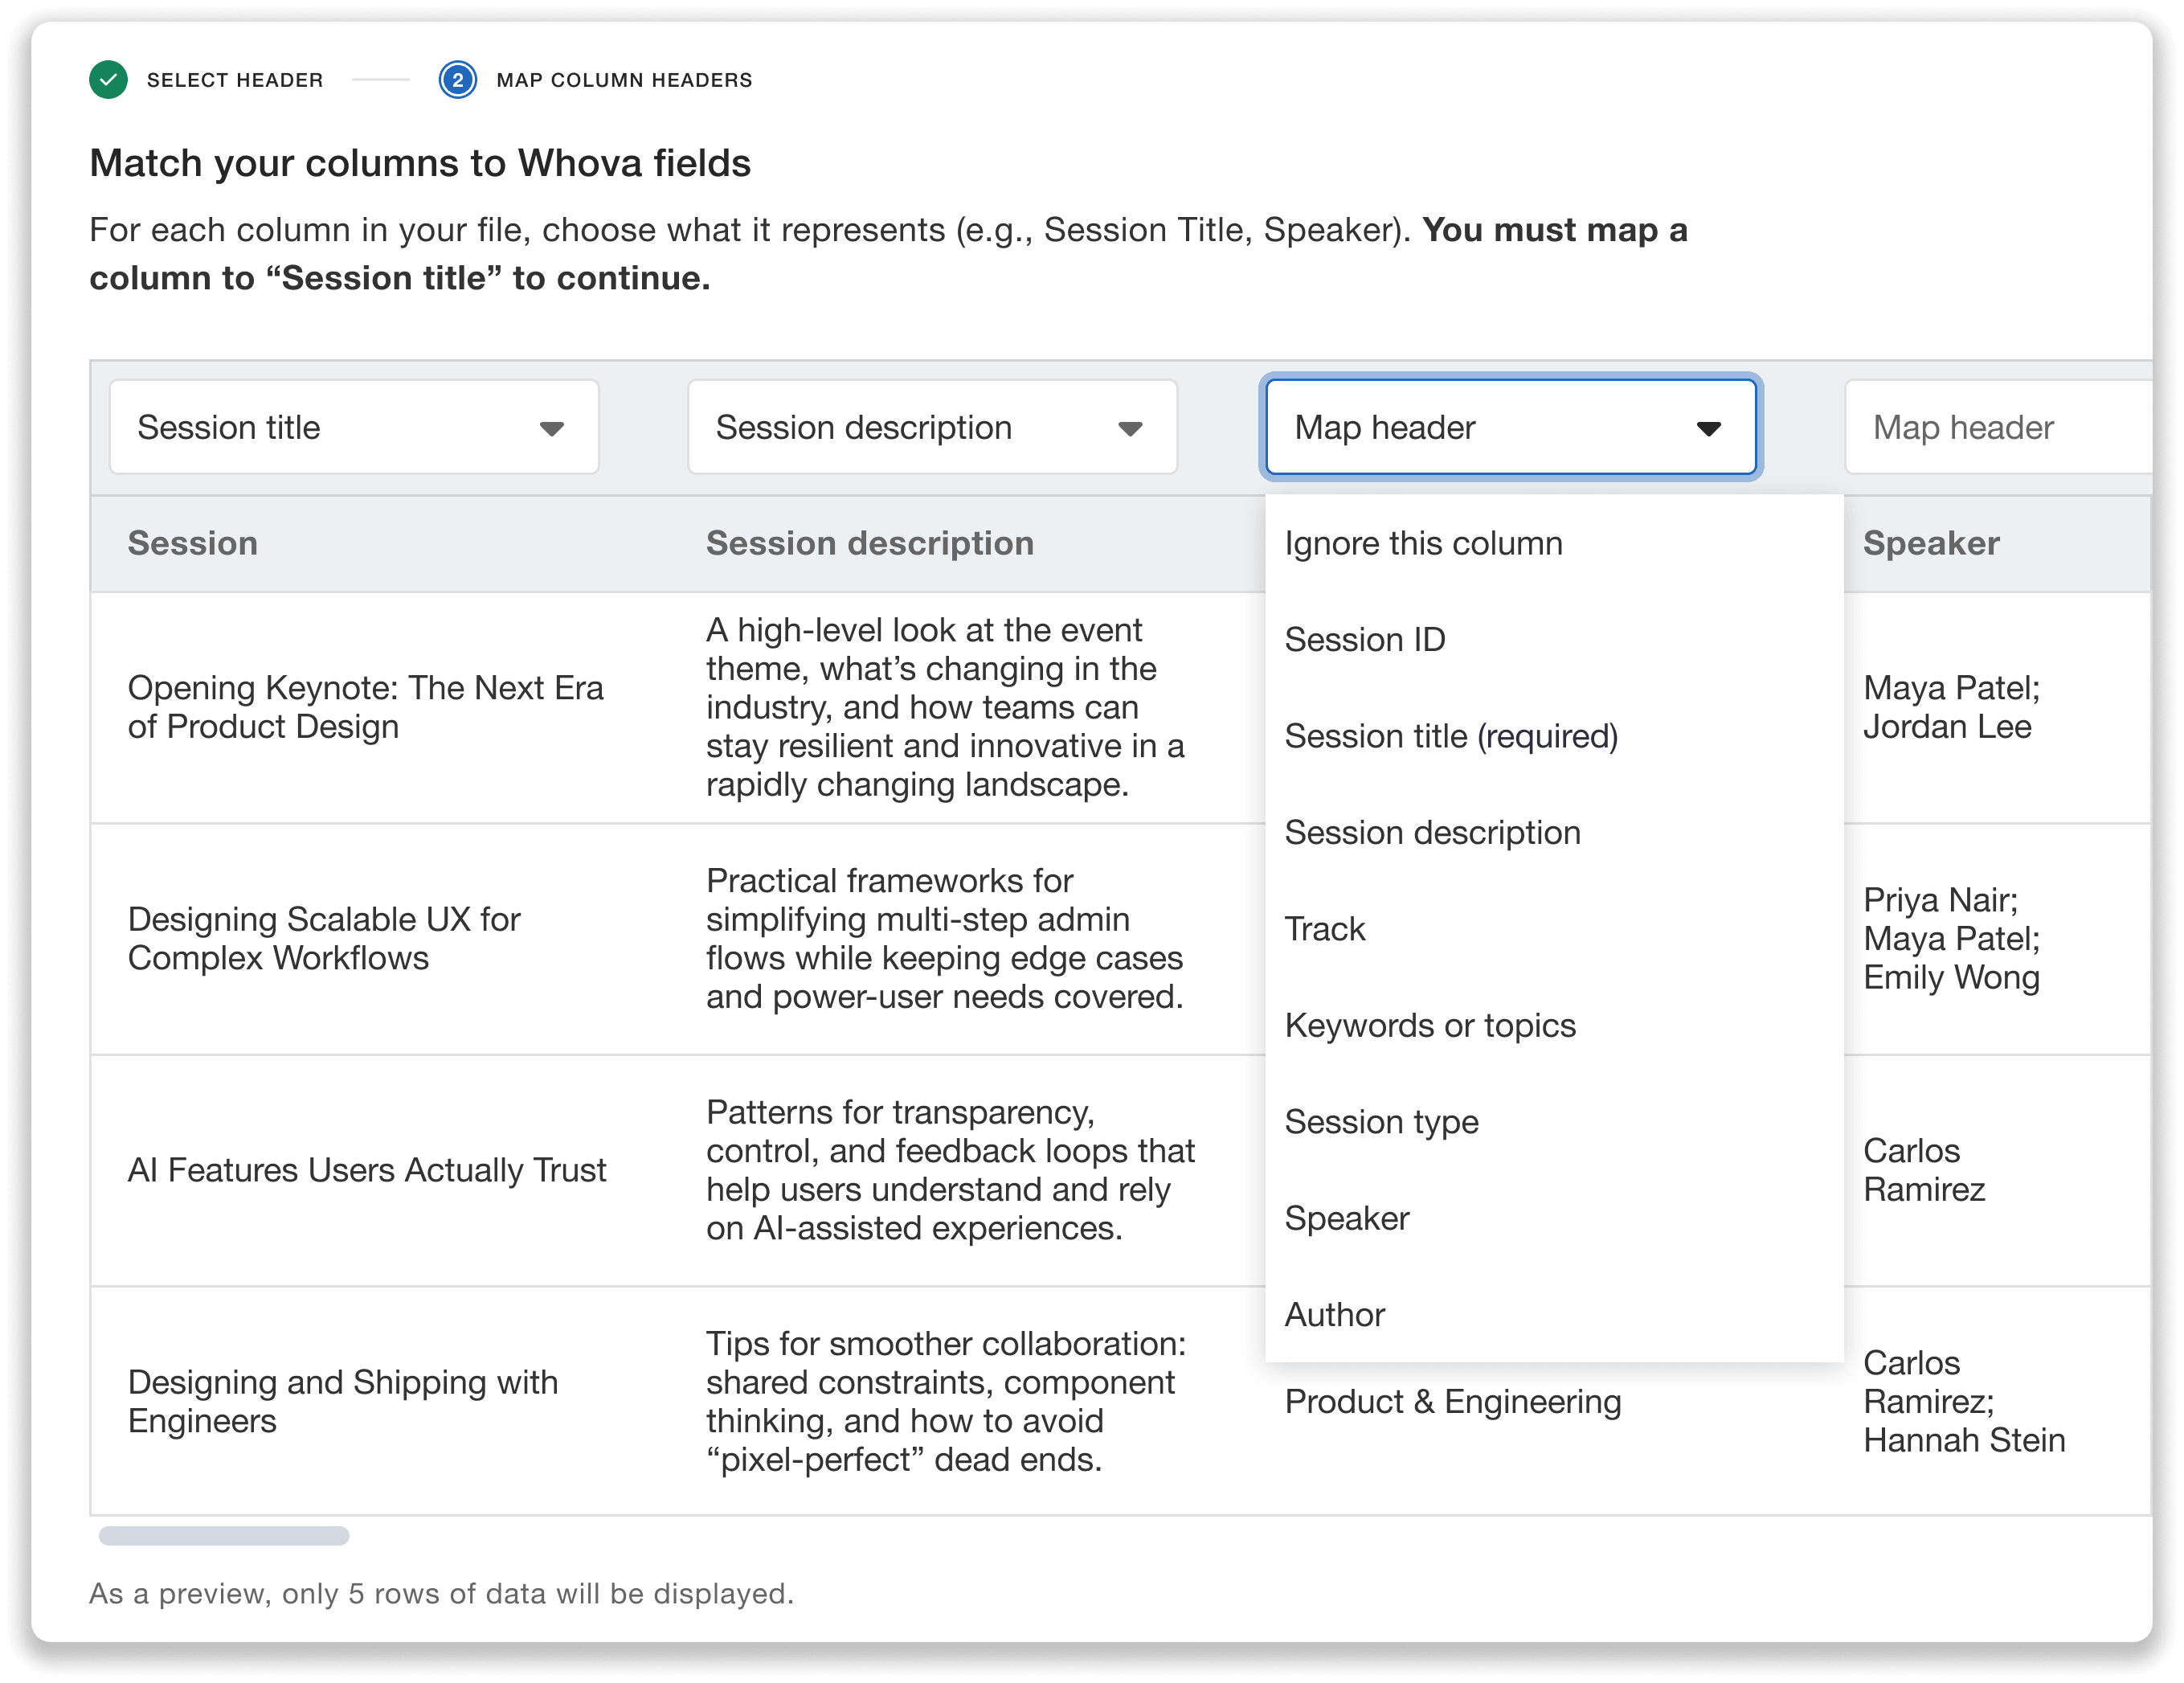
Conveniently map your custom spreadsheet data to Whova fields.
Your options are:
- Session title (required)
- Session ID
- Session description
- Track
- Keywords or topics
- Session type
- Speaker
- Author
- Ignore this column (choose this if you want to exclude a column from the import)
If your spreadsheet includes tracks, you’ll be asked to specify whether sessions can belong to multiple tracks or only one. If multiple tracks are allowed, you can indicate how they’re separated within each cell. For example, if tracks are separated by semicolons (e.g., “Cybersecurity; Machine Learning”), you can select that format so Whova can correctly import them.
You’ll be able to preview any detected tracks before confirming.
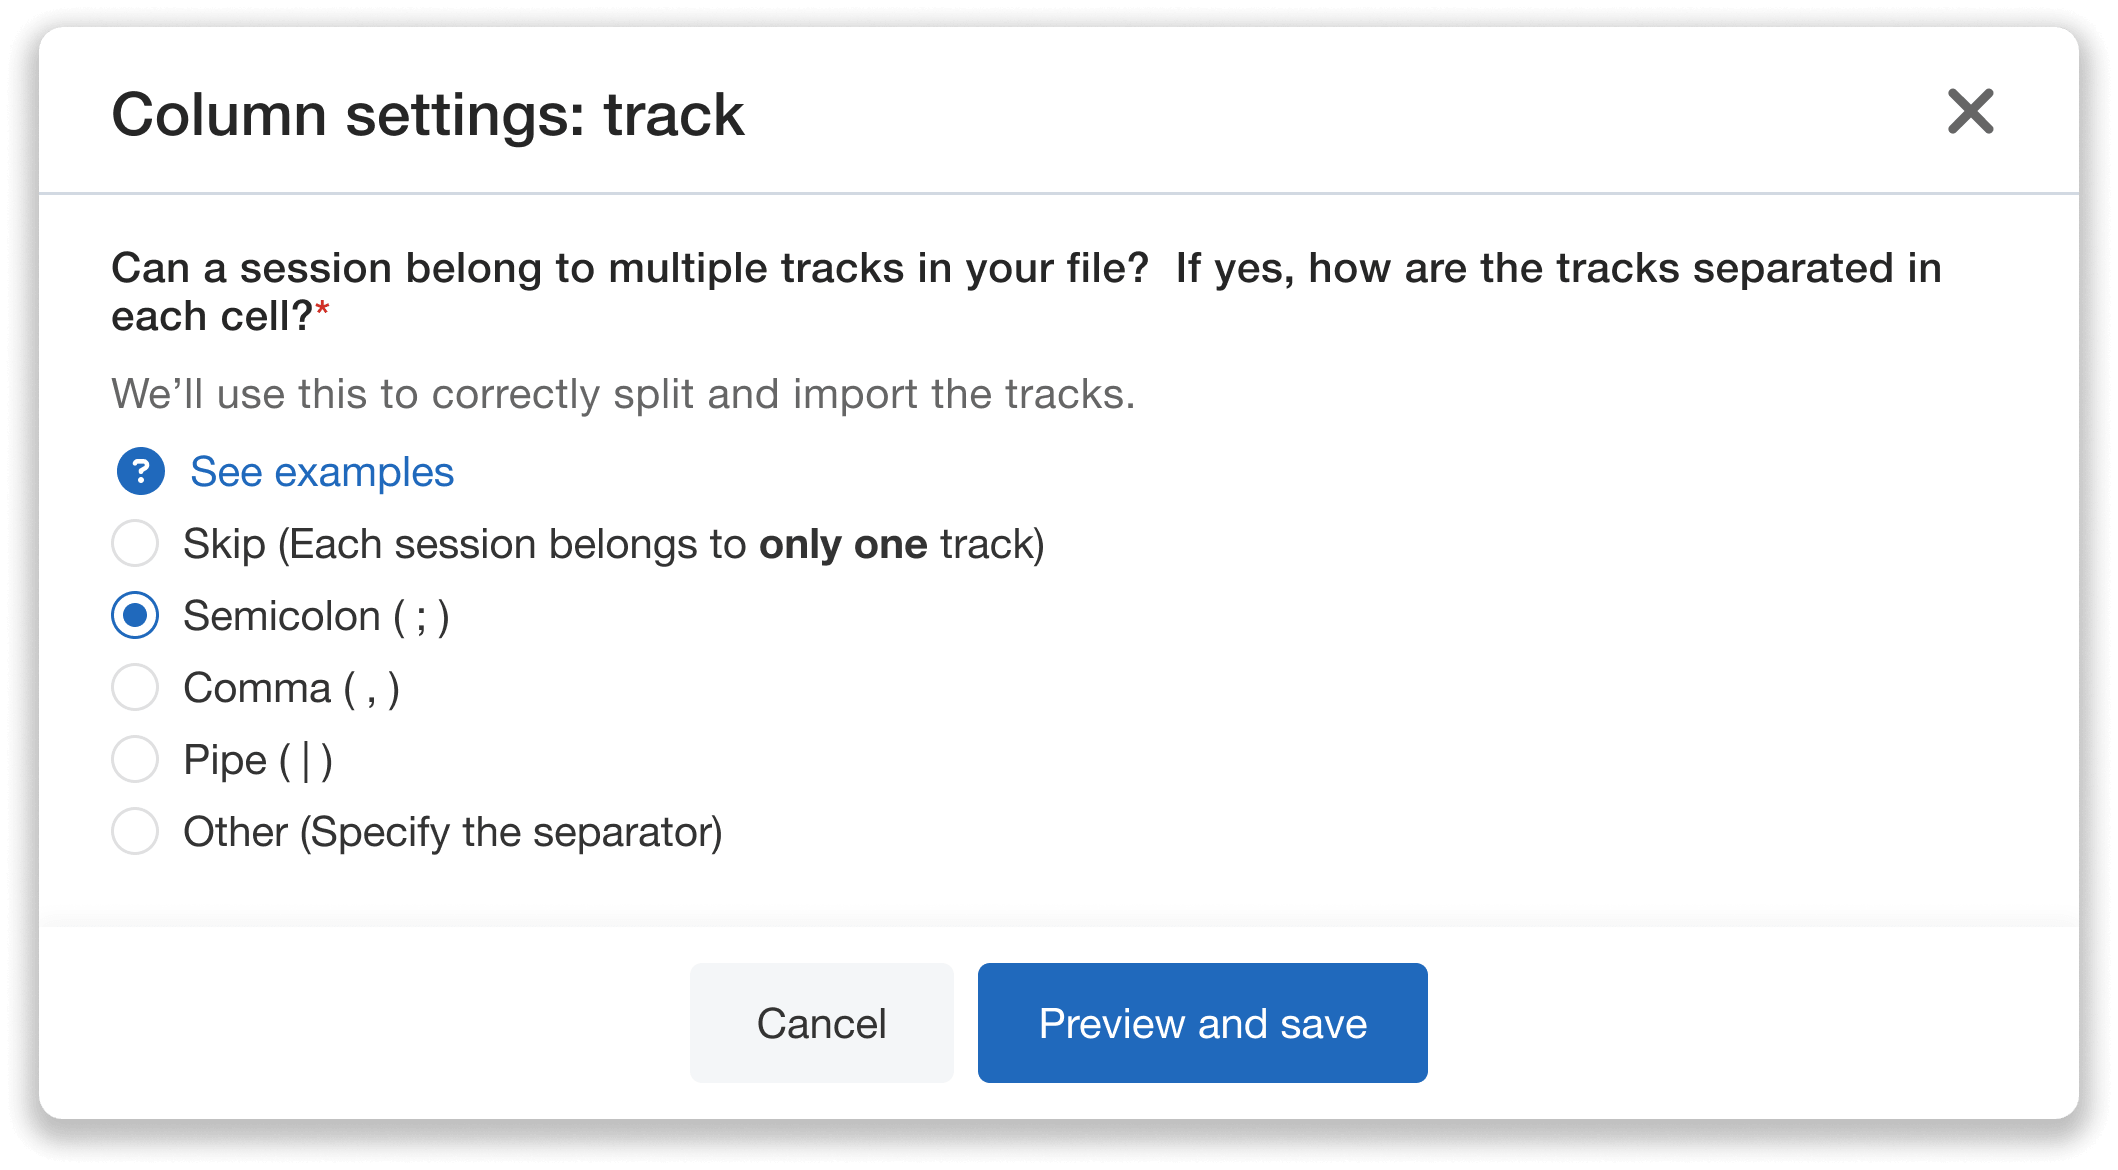
Easily import multiple tracks for each session—simply indicate how they’re separated.
If your spreadsheet includes speakers or authors, you’ll answer a few additional questions about how their names, emails, and affiliations (if included) are formatted.
For instance, if your file uses formatting like “John Smith [jsmith@email.com],” you can specify the use of brackets so Whova can correctly separate names from email addresses. You’ll also be able to preview the speaker or author data to confirm before continuing.
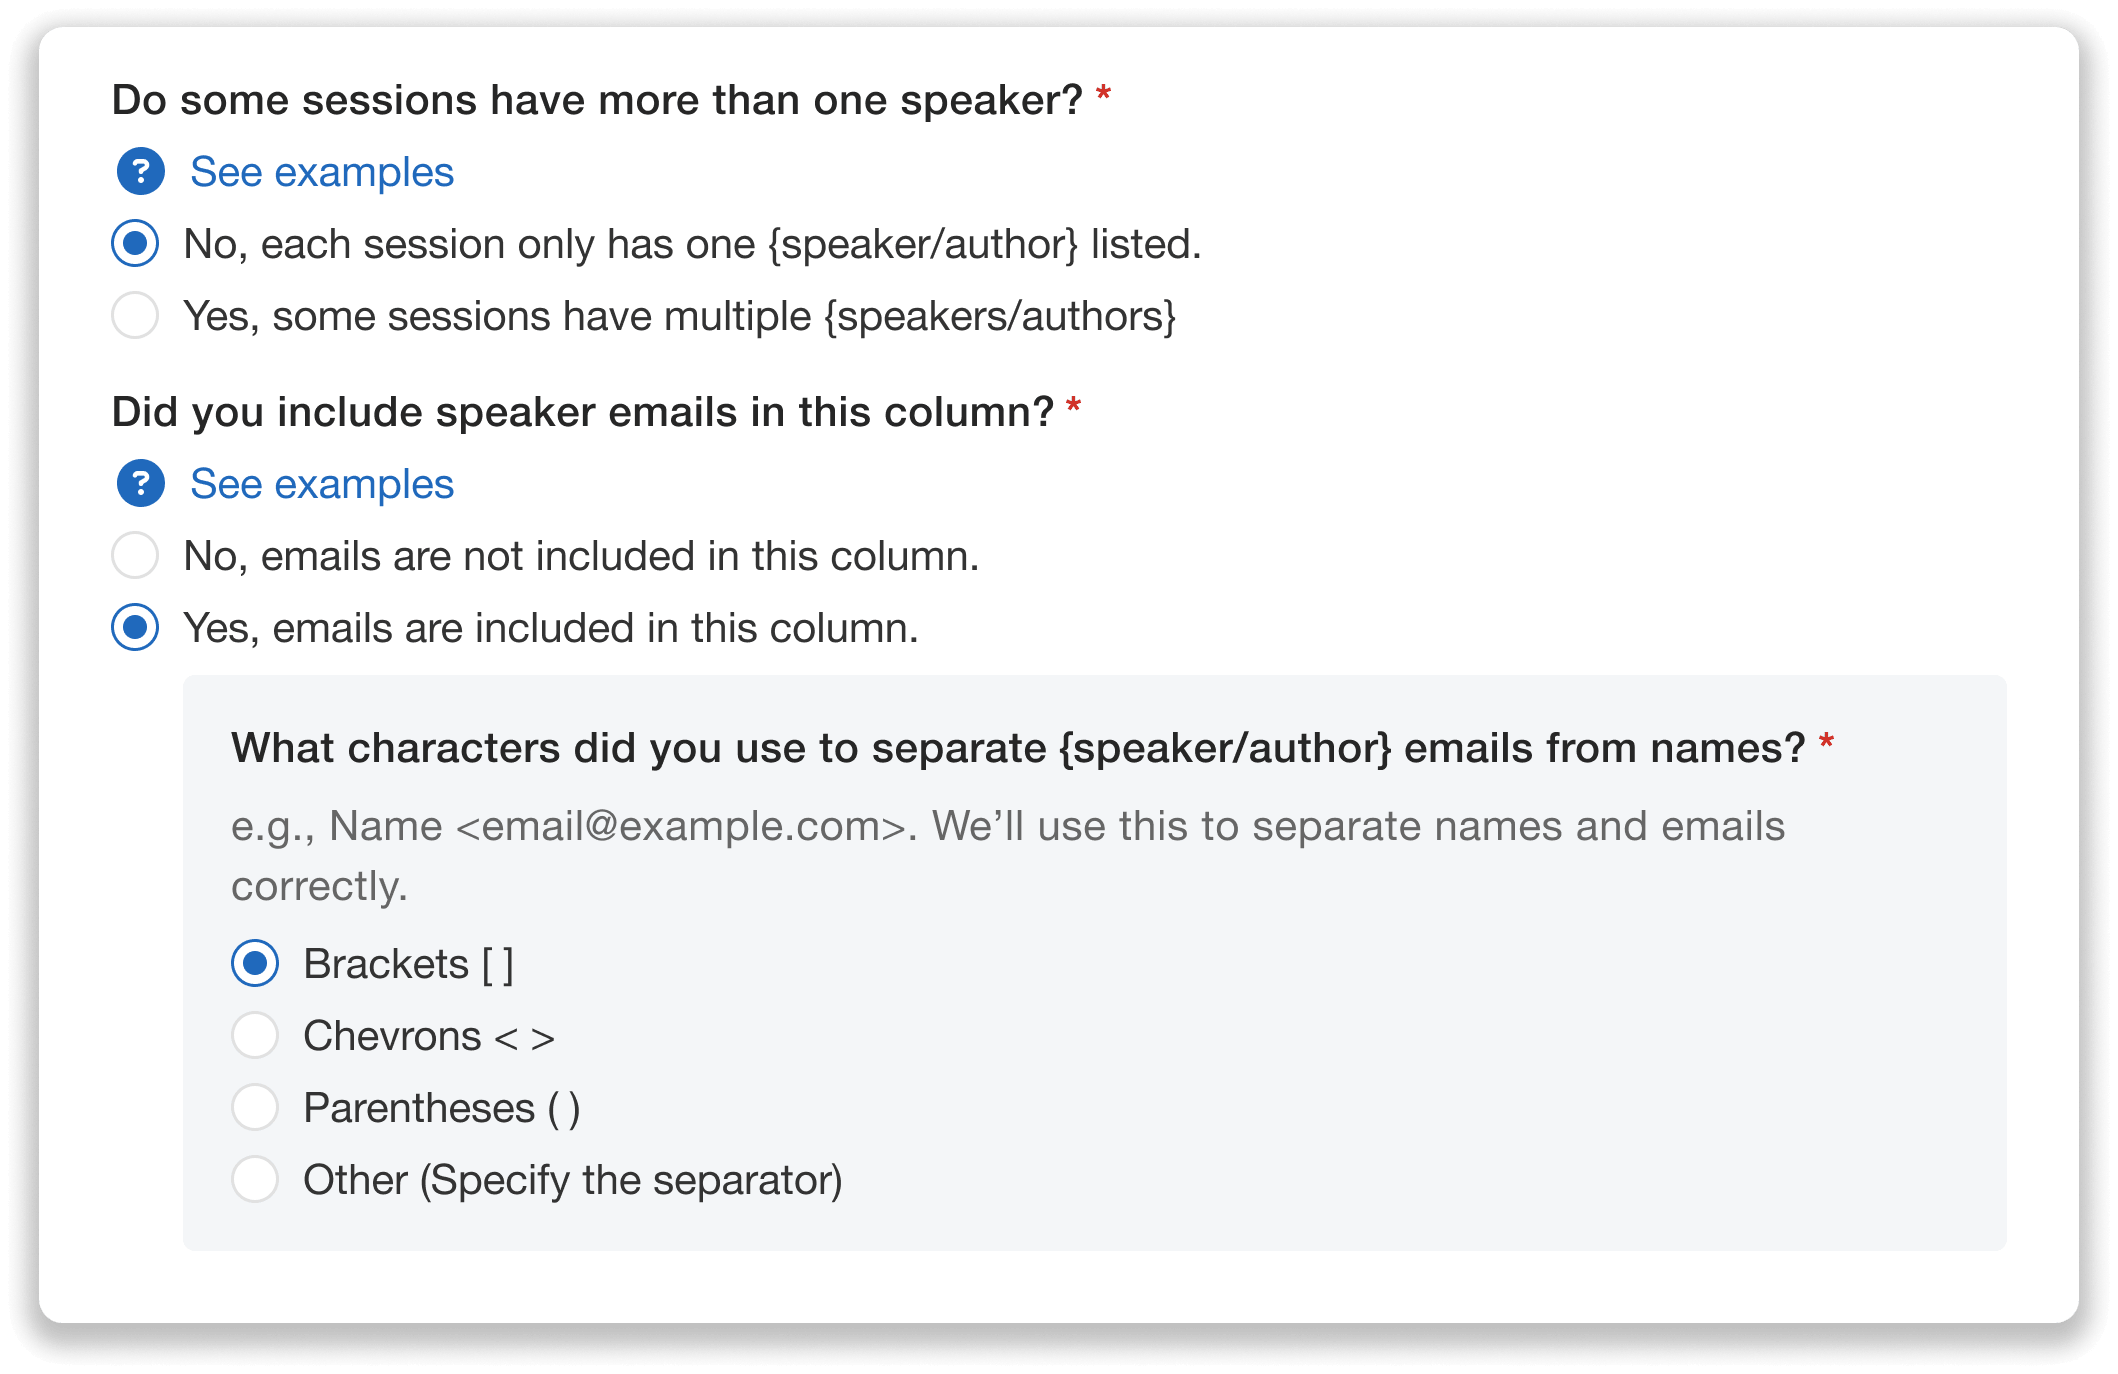
Select how your speakers and authors are formatted to ensure a smooth import.
Finally, you’ll review a summary of the sessions you’re about to import.
If your spreadsheet does not include Session IDs, Whova will automatically generate IDs for each session when you import. An updated file containing these IDs will be provided for download, so you can reuse it in future uploads. Session IDs allow Whova to match and update the correct sessions when you re-import data later.
Schedule Sessions in Just a Few Clicks
Once your file has been successfully imported, you have two options for scheduling sessions:
Schedule directly in the agenda
The first option is to schedule sessions straight from the Session Manager while building your agenda. Simply click “Add session” in a specific time slot and select “From imported session list.”
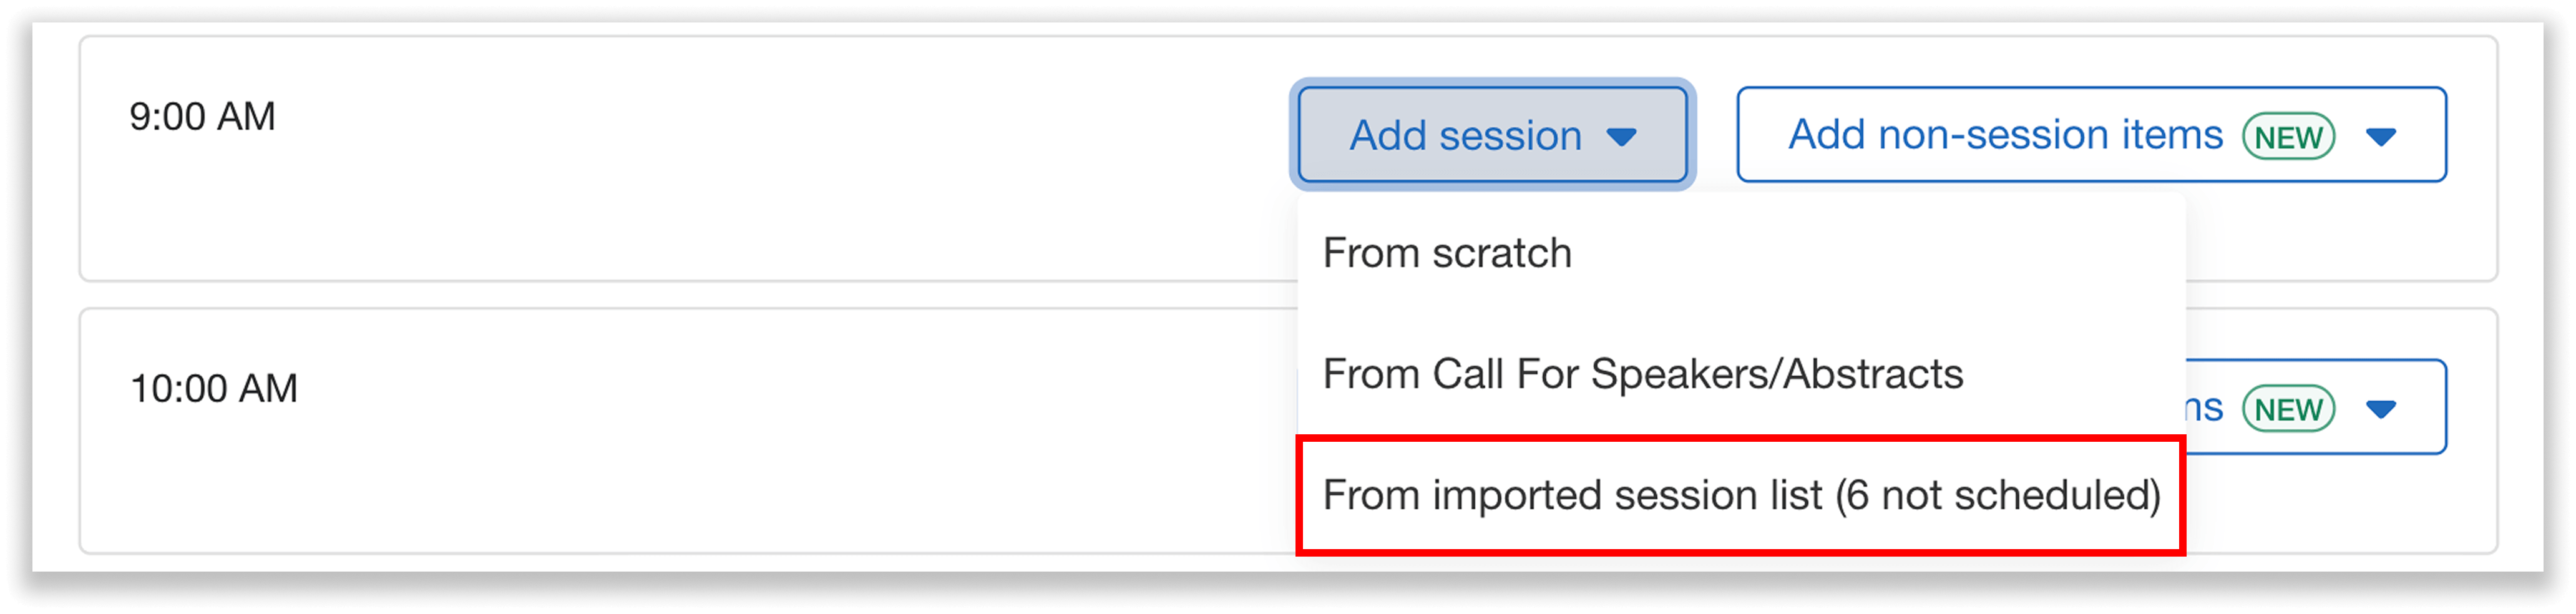
Schedule your imported sessions directly from the agenda.
You’ll then see a list of all uploaded sessions. Whova will show you exactly how many still need to be scheduled.
From here, you can search and filter unscheduled sessions by title, speaker, track, and more. Select the session you want to schedule and add it to your agenda.
Whova will automatically prefill details like the session title and description (if included in your upload). You can still edit these details freely, and any changes made in the agenda will not affect the original session data in your session list.
Schedule from the session list view
You can also manage and schedule sessions directly from the session list page.
In the Session Manager, click “See imported session list” to open the list view. Here, you’ll see key session details, including session title, ID (automatically generated if not included in your spreadsheet), speakers, and date and time (if already scheduled).
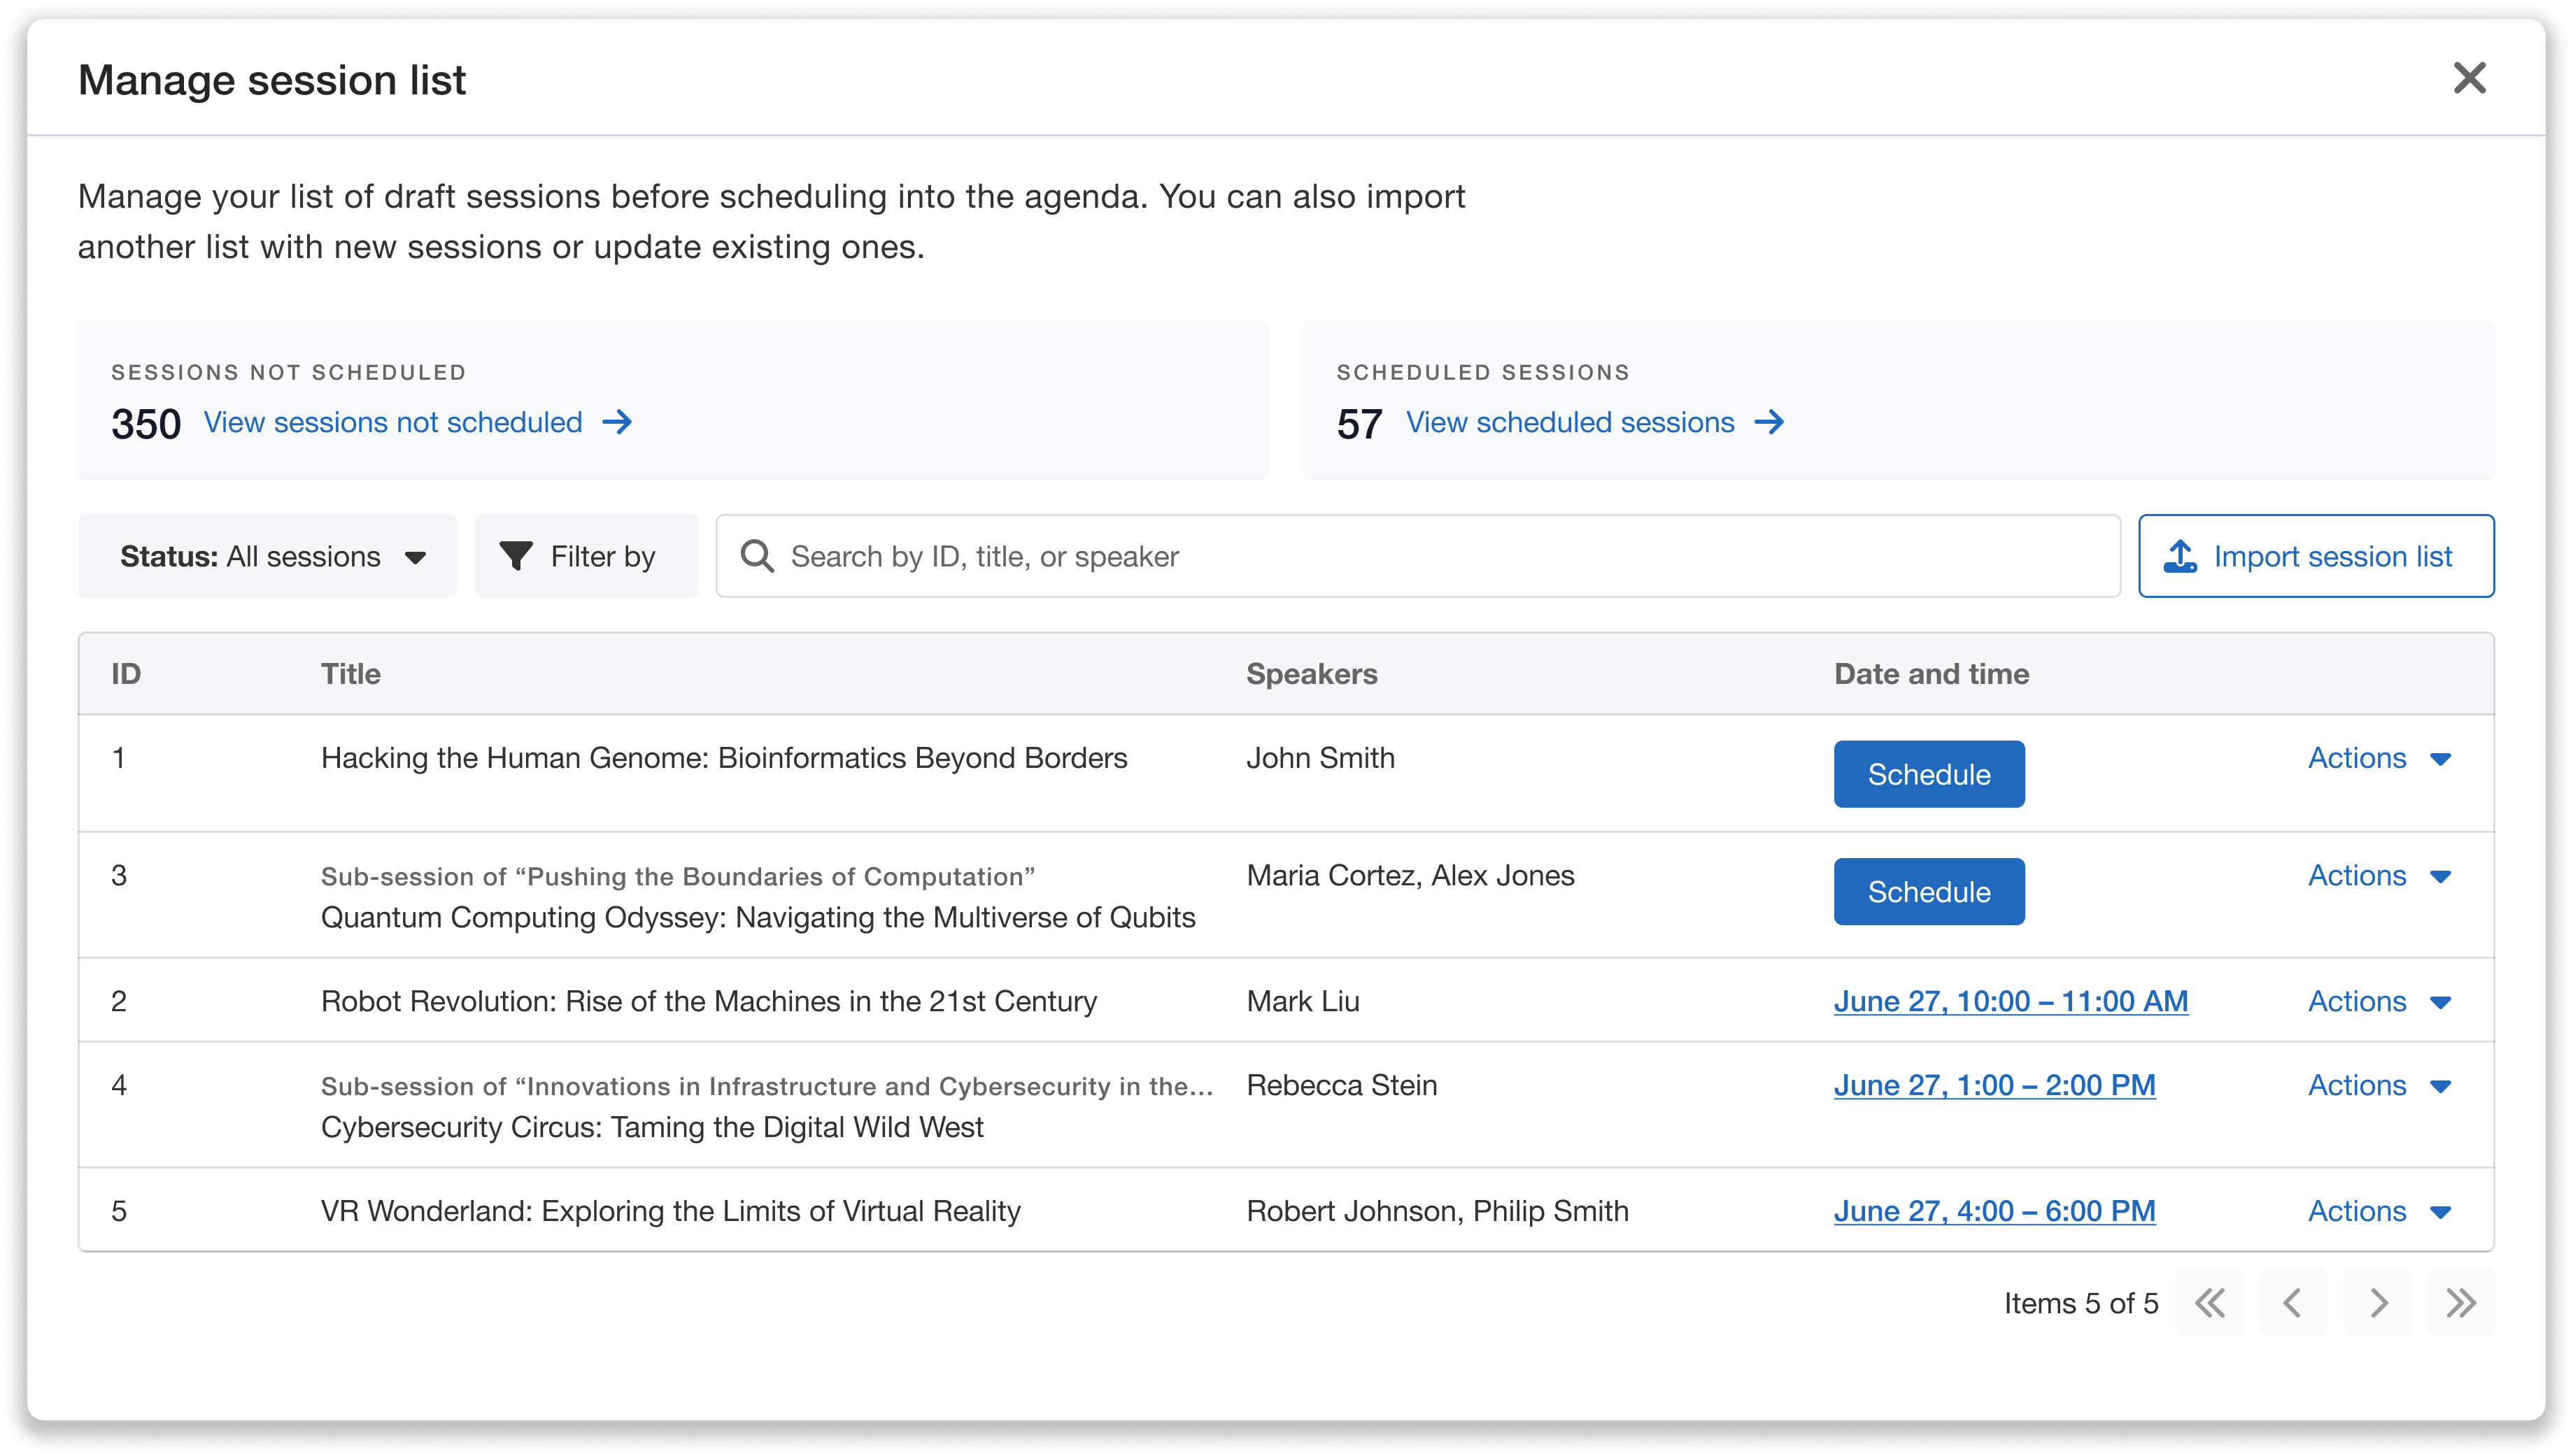
View and schedule sessions straight from your list of imported sessions.
Just like with the first scheduling option, you can search and filter sessions by title, speaker, track, and other fields. You can also filter by scheduled and unscheduled sessions to get a clear picture of your progress.
For any session that hasn’t been scheduled yet, you’ll see a Schedule option. Selecting it will create the session in your agenda with prefilled details, which you can then adjust as needed without impacting the original imported session list.
Once scheduled, you can view the full agenda from the Session Manager.
Update Your Program with Re-Imports
You can continue to build and refine your program by uploading additional spreadsheets.
When you import a new file, Whova will save the mappings from your last upload so you don’t have to re-map existing columns to Whova fields (but you can edit as needed). Any new sessions will automatically be added to your session list. From there, you can schedule them into your agenda using the same workflow as before.
If your new file includes sessions that already exist, Whova will update those sessions with any new or changed information from the spreadsheet. This applies even if the sessions have already been scheduled in your agenda—updates from the import will be reflected in both the session list and scheduled agenda.
Existing sessions are matched using Session ID, which ensures the correct sessions are updated rather than duplicated. Any sessions with new IDs will be treated as new entries and added to your session list.
If your initial import does not include Session IDs, Whova will automatically assign IDs to your sessions. You’ll receive an updated spreadsheet containing these IDs, which you can download and reuse for future imports. This helps ensure that all subsequent uploads correctly match and update the right sessions in your program.
Build Your Agenda Faster with Custom Session List Imports
Custom Session List Import makes it easier to bring session data into Whova without reformatting spreadsheet data into a fixed template. Just upload your existing file, map columns to Whova fields, and re-import as your agenda evolves to move from raw data to a structured program with far less manual work.
Whether your session list comes from Excel, Google Sheets, or another abstract management system, you can quickly import and schedule sessions in Whova while keeping your program up to date.
To learn more about Custom Session List Import or see it in action, request a demo or contact your Whova representative today.