November 19, 2025
Event registration is where it all begins—it’s the first touchpoint with your attendees and one of the most important parts of your event’s success. Thousands of organizers rely on Whova’s all-in-one registration system each year to manage everything from ticketing and payments to attendee data and analytics, all fully connected to the rest of the Whova platform.
Organizers save hours thanks to Whova’s seamless automation: attendee lists update instantly upon signup, data flows directly into your event app, and reports are always up to date. Features like discounted group tickets and early bird pricing incentivize sign-ups, and invite-only ticketing, as well as integrations with various AMS systems including MemberClicks, iMIS, WildApricot, and more, keep certain ticket types exclusive. Another recent popular release, Attendee Segments, allows you to automatically group attendees by add-on purchases or registration form responses for effortless exporting, targeted announcements, or automatic inclusion in name badges.
Now, we’re bringing even more flexibility and efficiency to registration management with a highly requested update: Bulk Discount Code Import and Export.
Nearly half of events using Whova registration already use discount codes to attract different audiences—from students and members to sponsors and VIP partners. Until now, organizers needed to create each code manually, which could be time-consuming for events with multiple promotions or audience types.
With this enhancement, you can now:
- Import Discount Codes in Bulk: Upload all your codes at once with a simple Excel template—perfect for setting up dozens of codes in minutes.
- Export Discount Codes: Quickly share codes with colleagues or committee members for review or recordkeeping.
- Limit codes to one discounted ticket per buyer to prevent duplicate use.
- Export ticket sale summaries alongside discount data for instant performance tracking, and see usage of discount codes.
Here are a few real-world examples where bulk import saves organizers hours of tedious work:
- Universities and association conferences giving unique department- or chapter-specific codes.
- Large expos and partner events that provide custom codes for each sponsor, exhibitor, or marketing partner.
- Marketing campaigns using unique one-time codes to track which promotions drive the most sign-ups.
With this enhancement, we’re taking a commonly-used feature and making it even more useful and flexible—whatever your discount code needs are, Whova’s got you covered.
How to Bulk Import Your Discount Codes
Bulk importing your discount codes is easy with our new enhancement.
Once your tickets are set up, select “Discount Codes” in the Tickets tab. You’ll see the familiar option to create a new code, along with a new option: “Import from Excel.”
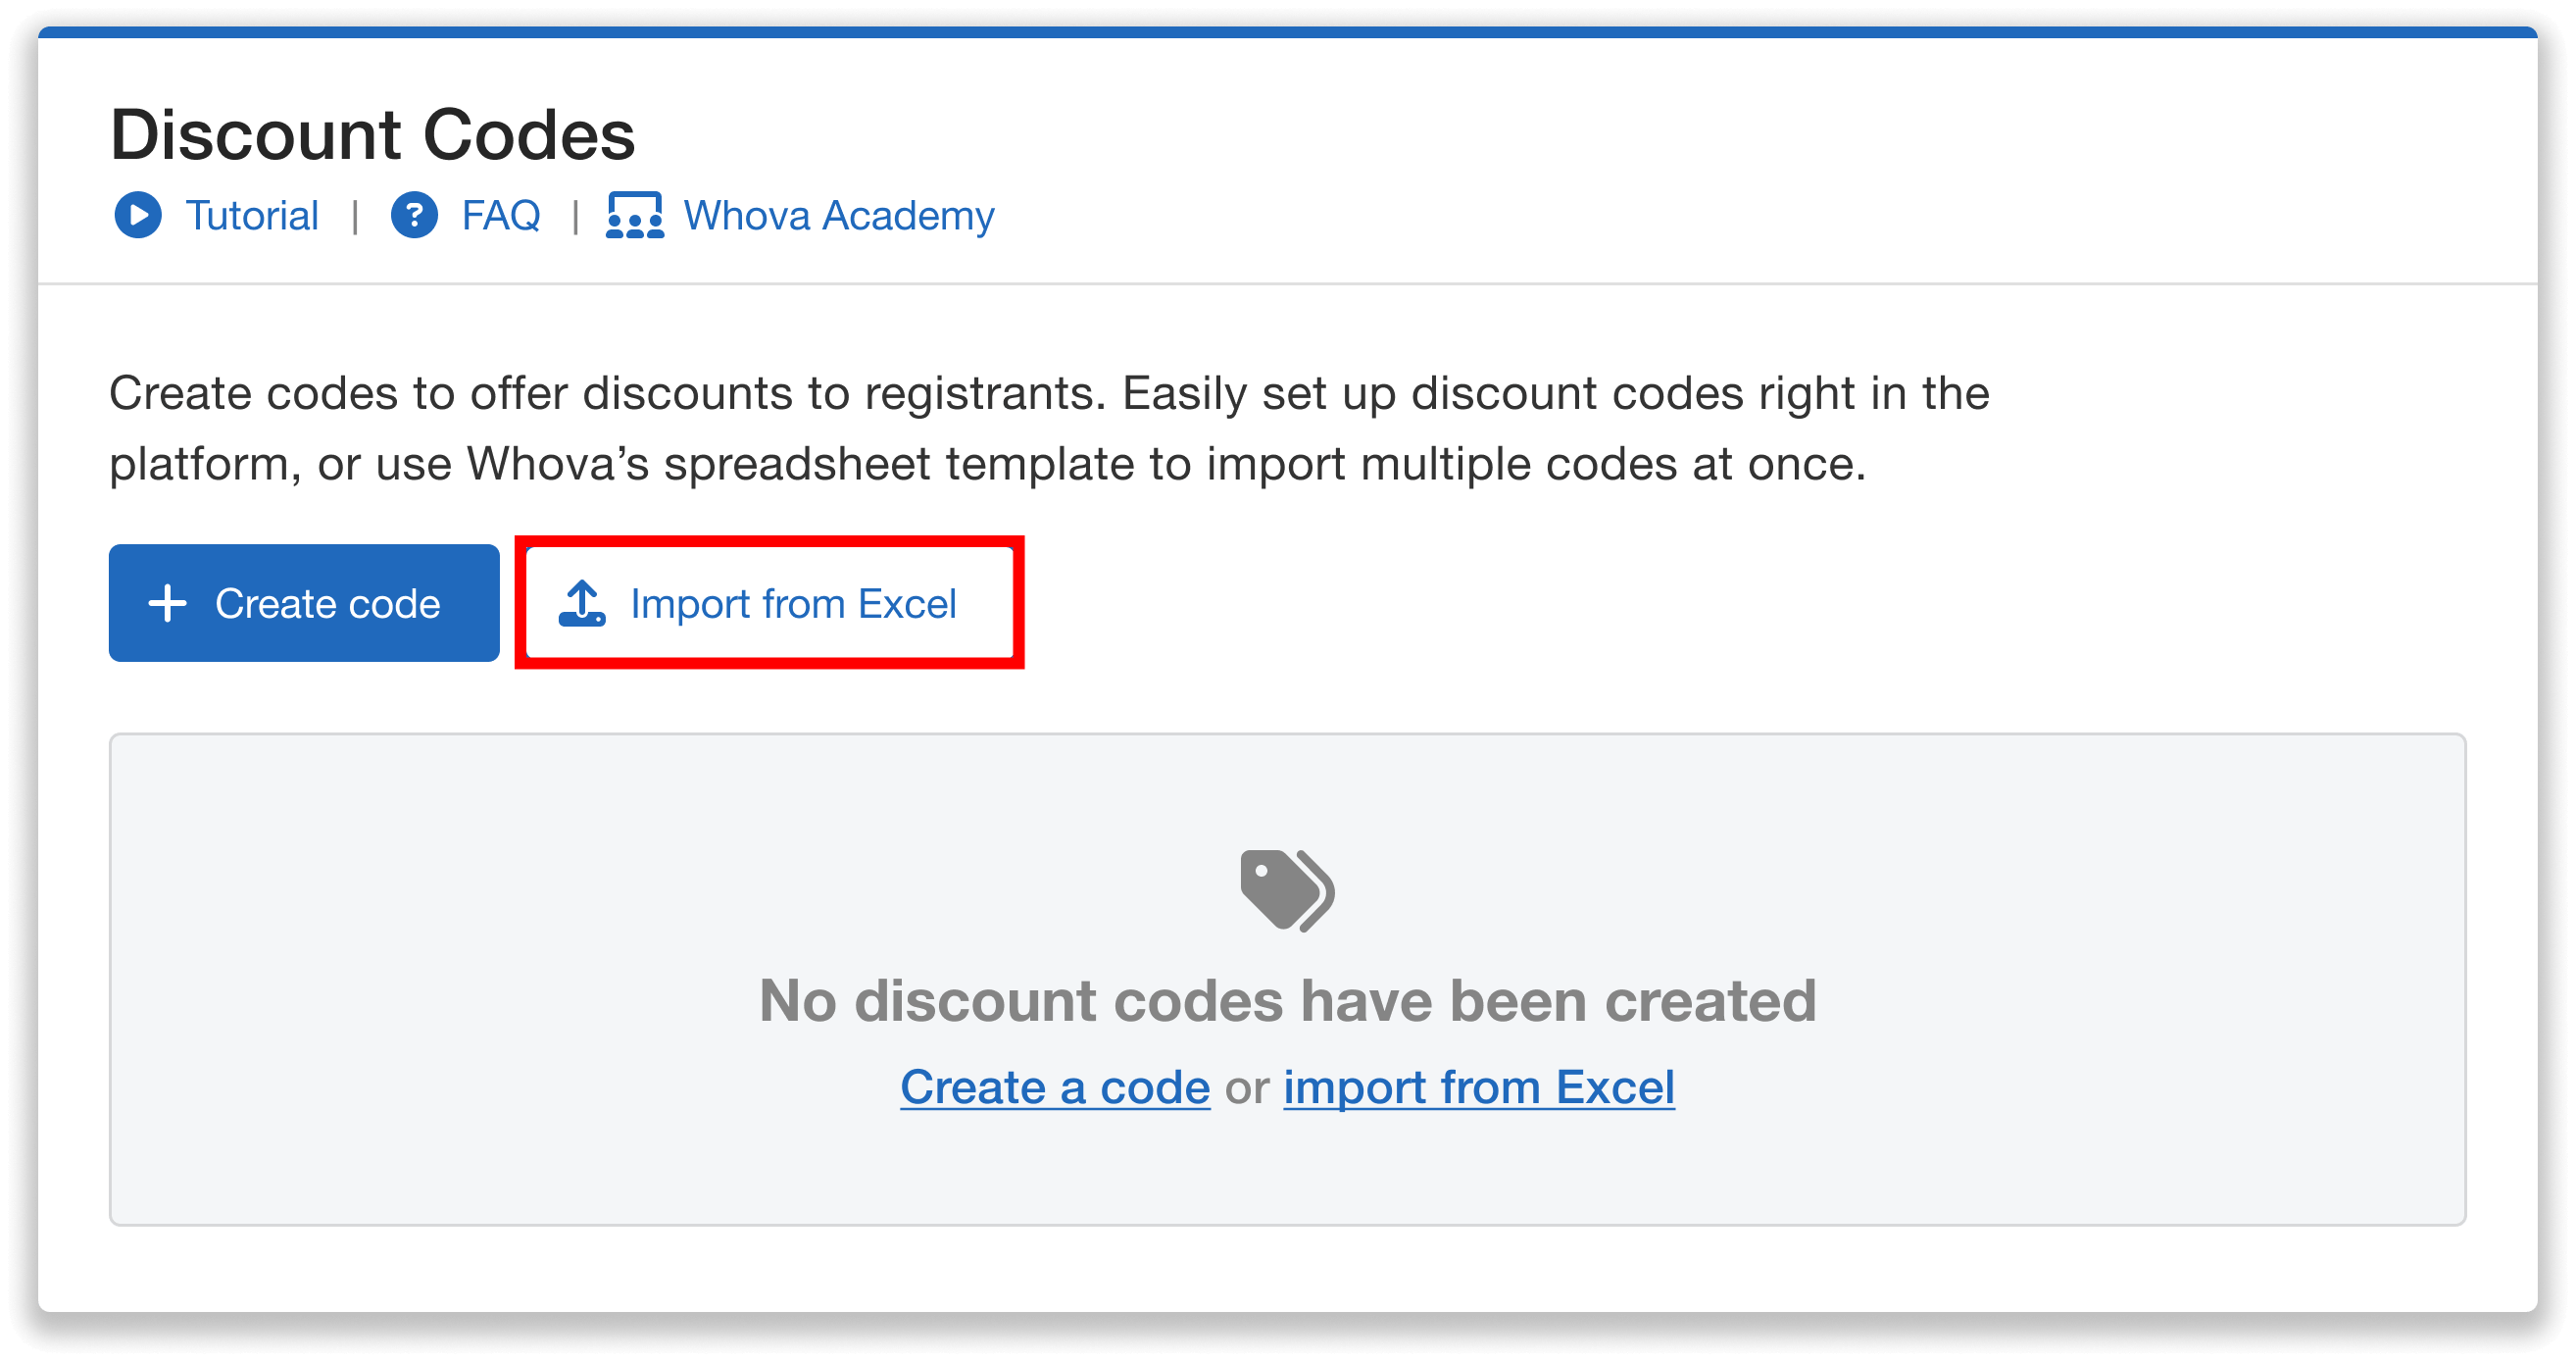
Bulk uploading discount codes is simple with Whova’s “Import from Excel” option.
Once you select this import option, you can follow two simple steps to prepare and upload your codes:
1. First, you’ll download the Whova Template, which provides a ready-to-use structure for you to enter in all your codes and key details. Make sure that the list follows the format provided in the template.
2. Next, you’ll save and upload your completed list as an .xlsx file. Once the discount codes have been imported, they will appear in Whova without any additional manual entry—saving significant time for events that manage multiple audiences, campaigns, or partner-specific offers.
Filling out the template is quick and intuitive:
- Each code needs a name, start date/time, end date/time, and number of uses available.
- You can also specify the discount amount, either as a flat amount or as a percentage of the ticket price.
- You can indicate one or more ticket types that a given code should apply to (e.g., if you’re managing complimentary student registration for scholarship recipients), or leave the field blank to allow the code to be used for all ticket types (e.g., if you’re offering a general promotion).
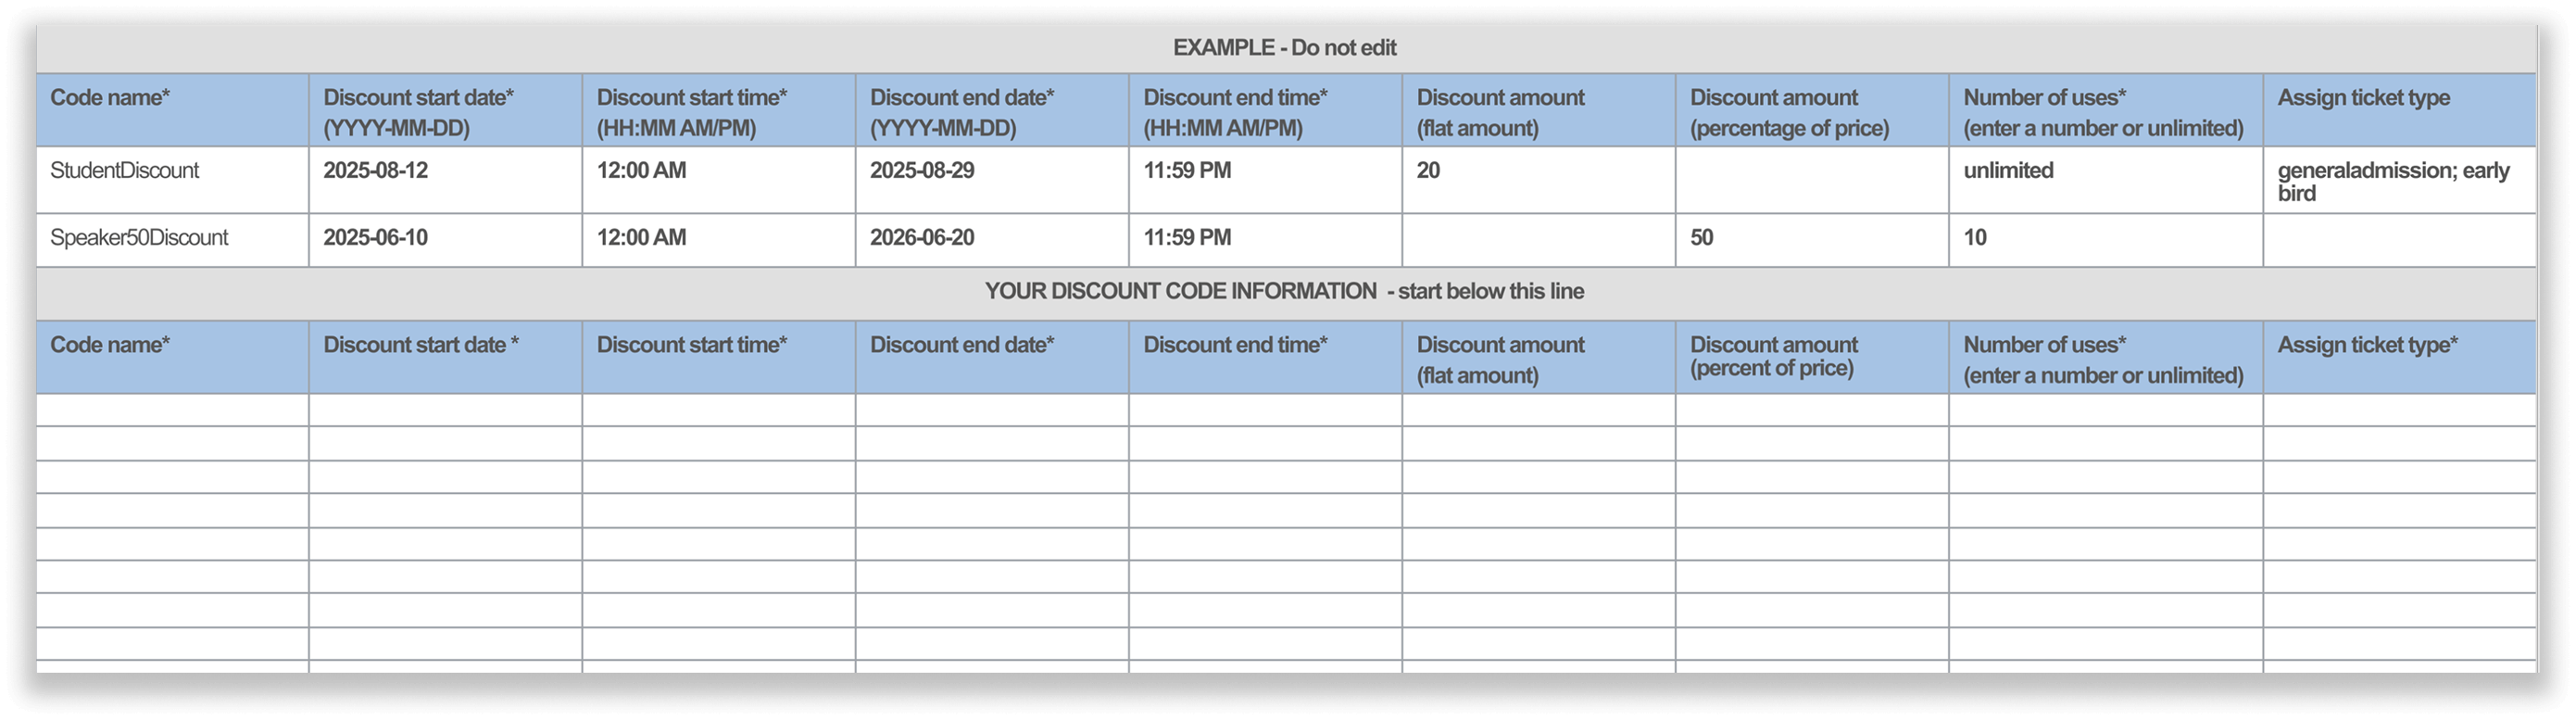
The Discount Codes Template is straightforward—follow the instructions to add your codes.
Once your file is successfully uploaded, all codes will be visible in your Discount Codes dashboard. You’ll see each code, its discount amount (for example, “50% off”), the start and end times, and how many times the code has been used (such as 0/unlimited, 1/1, or 2/50). A “Created by” column will show which admin added the code, giving teams clear visibility for smoother collaboration. You can also edit or delete codes individually as needed.
You can search your discounts by code name, as well as sort by name, discount amount, start time, end time, or number of uses—keeping everything organized when working with a longer list.
Limit Your Discount Codes to One Per Buyer
A common challenge with codes that have high or unlimited usage limits is controlling how they’re used without overcomplicating setup.
With this enhancement, you can now limit a code to one discounted ticket per buyer, even when the total number of allowed uses for that code is higher. For example, let’s say you’ve created a student discount with an unlimited number of uses, so that any eligible student can take advantage of it. You may still want to ensure that each registrant can only apply the code to one ticket.
When creating a discount code, scroll down to the advanced settings. Here, you can choose to limit the code to one discounted ticket per buyer, as opposed to allowing each buyer to use the code on all eligible tickets they purchase. If you’ve bulk uploaded your codes via the template, you can enable this setting by editing each relevant code after import.

It’s easy to limit a discount code to one ticket per buyer in advanced settings.
Another Update: Exporting Made Easy for Review and Tracking
Beyond setup and control, organizers also need a clear picture of how discounts perform. The new export options make it simple to review configurations, share details with your team, and analyze results.
From the Discount Codes page, you can now download your codes as an Excel file with a single click. This will export each code’s key details, such as the discount amount, start and end date, and assigned ticket type. You can then easily share this data with your team for review and recordkeeping, without having to pull details manually from the dashboard.
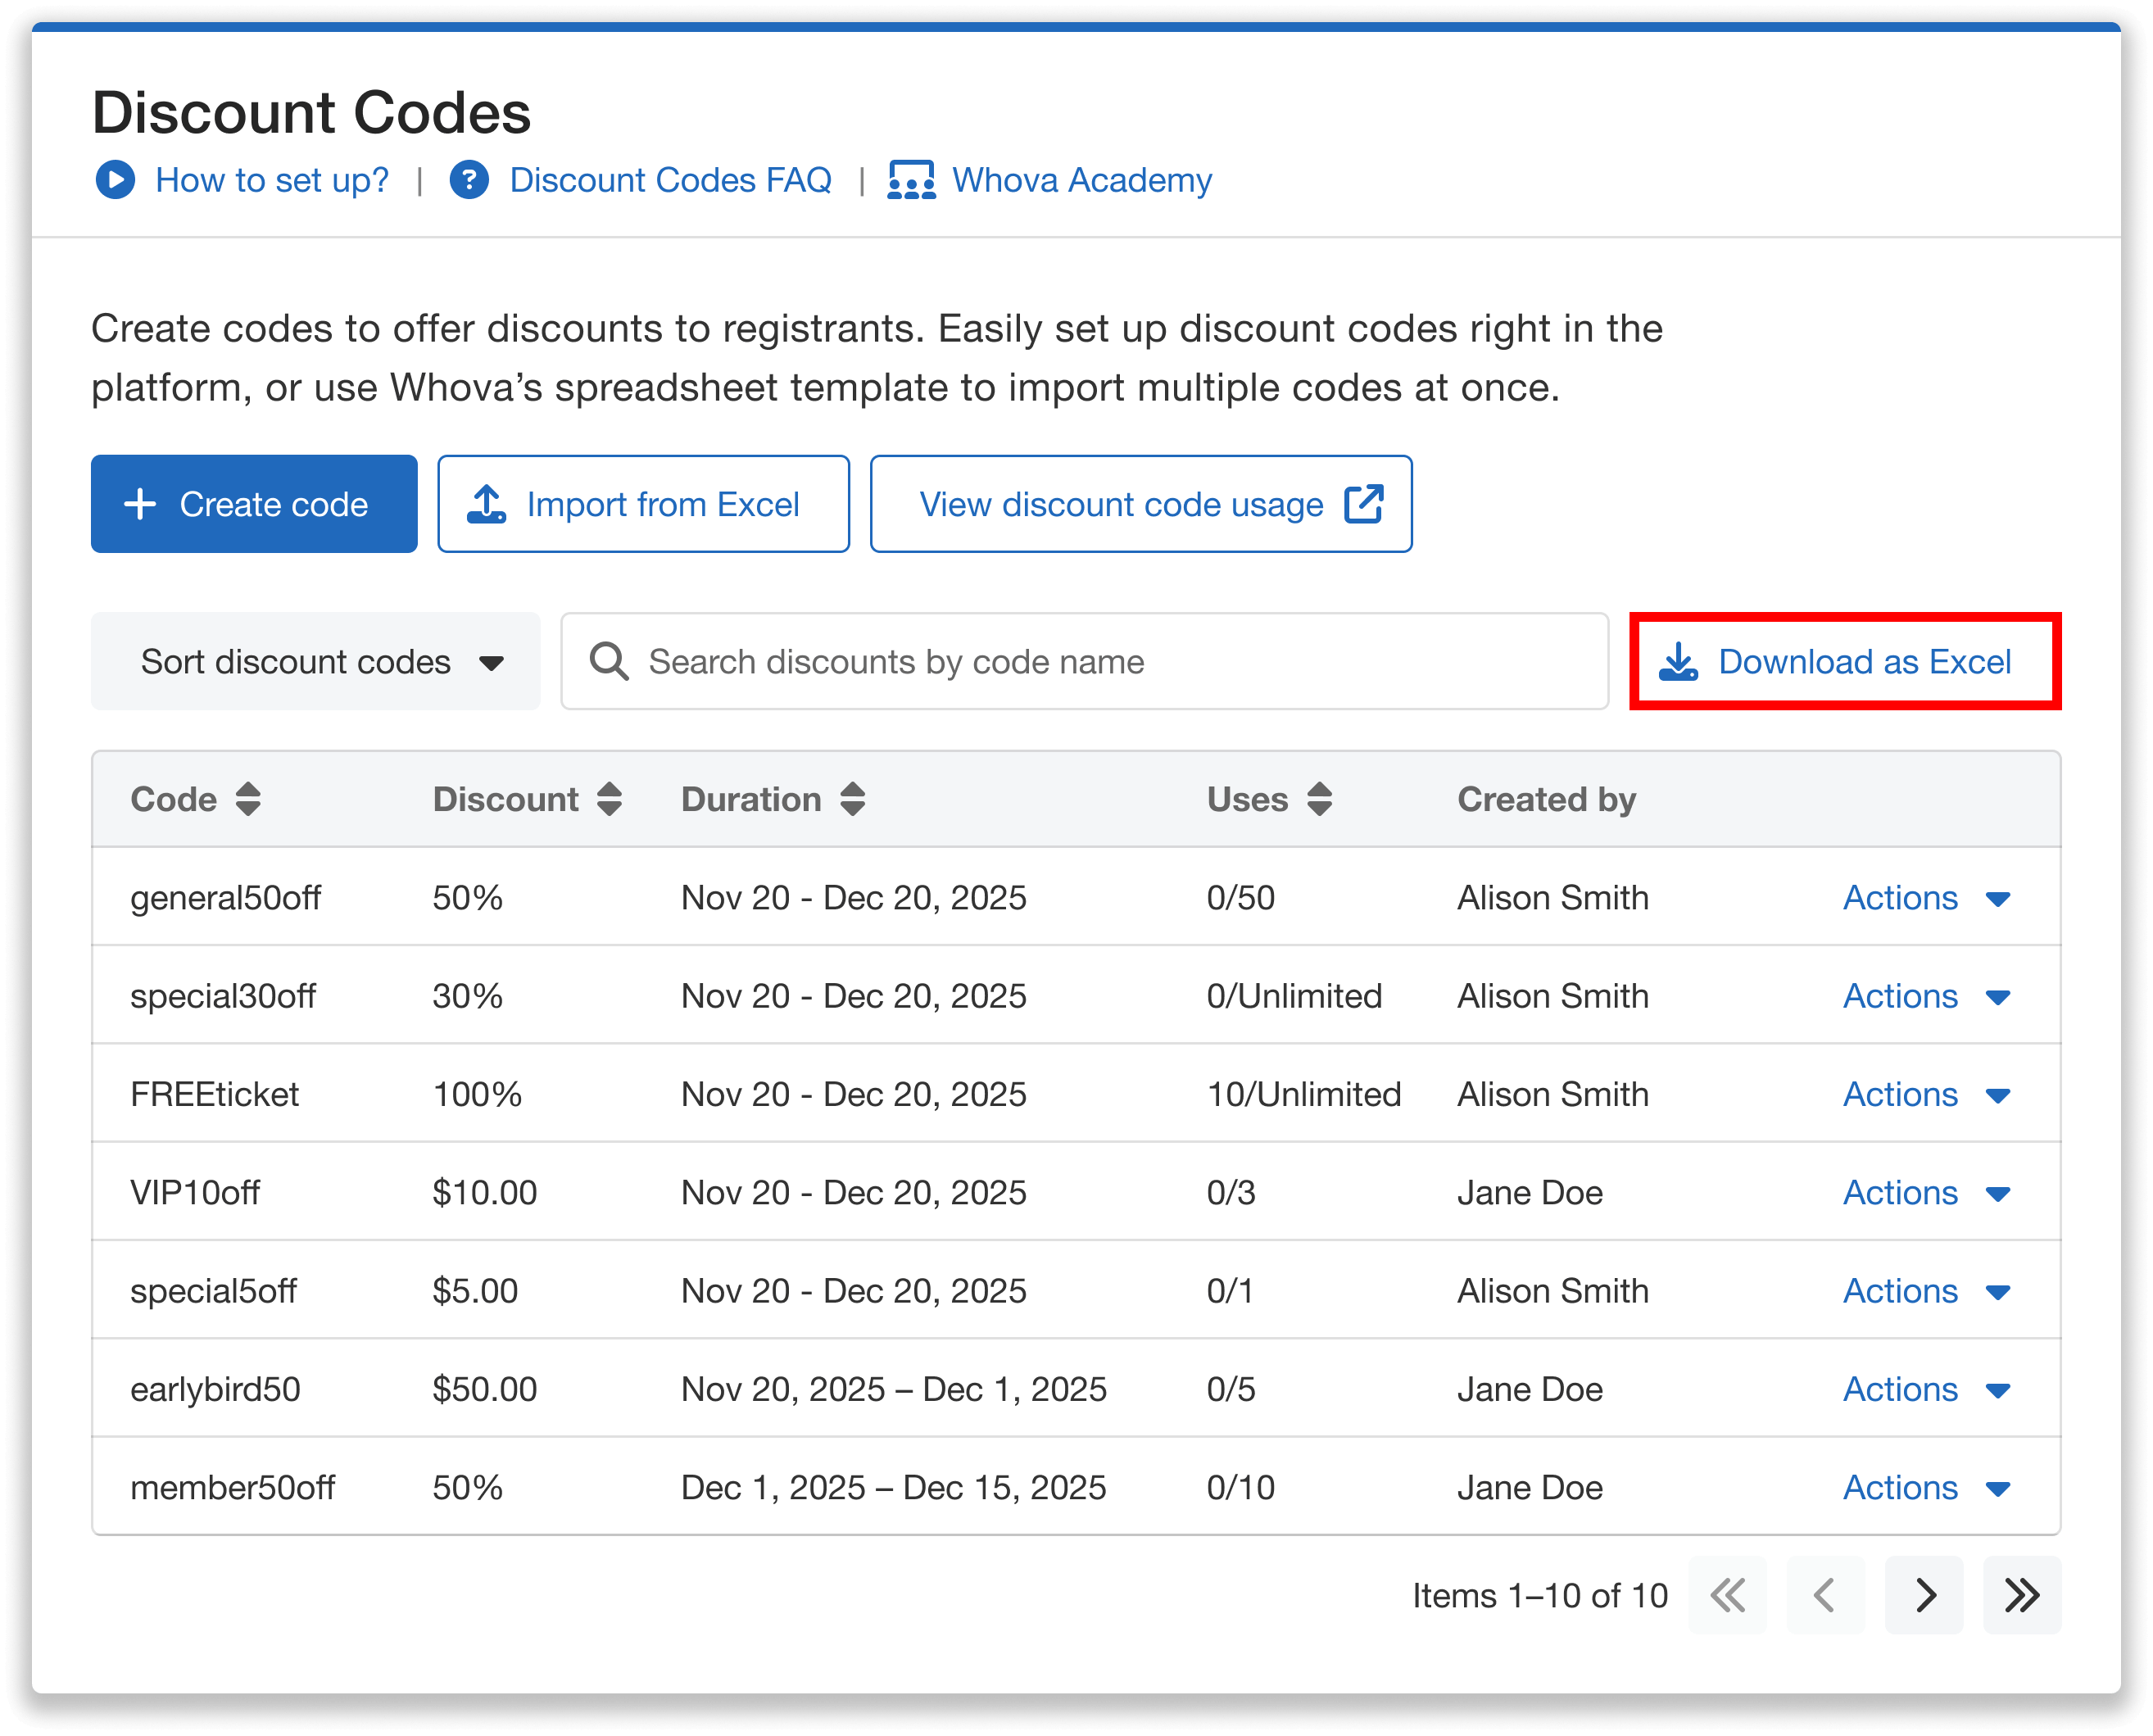
Download your codes to export key details like discount amount, start/end date, and assigned ticket type.
To view performance, you can select “View discount code usage,” which takes you to a ticket sale summary in the Attendee Orders page. Here, you’ll see how your discount codes have been applied, including data such as:
- The codes and discount amounts applied for each ticket
- Each ticket’s price (regular and discounted)
- Number of tickets sold
- Gross sales
- Net sales
You can also download this ticket sale summary as an Excel file—making it easy to export results and analyze the link between your promotional strategy and real registration outcomes.
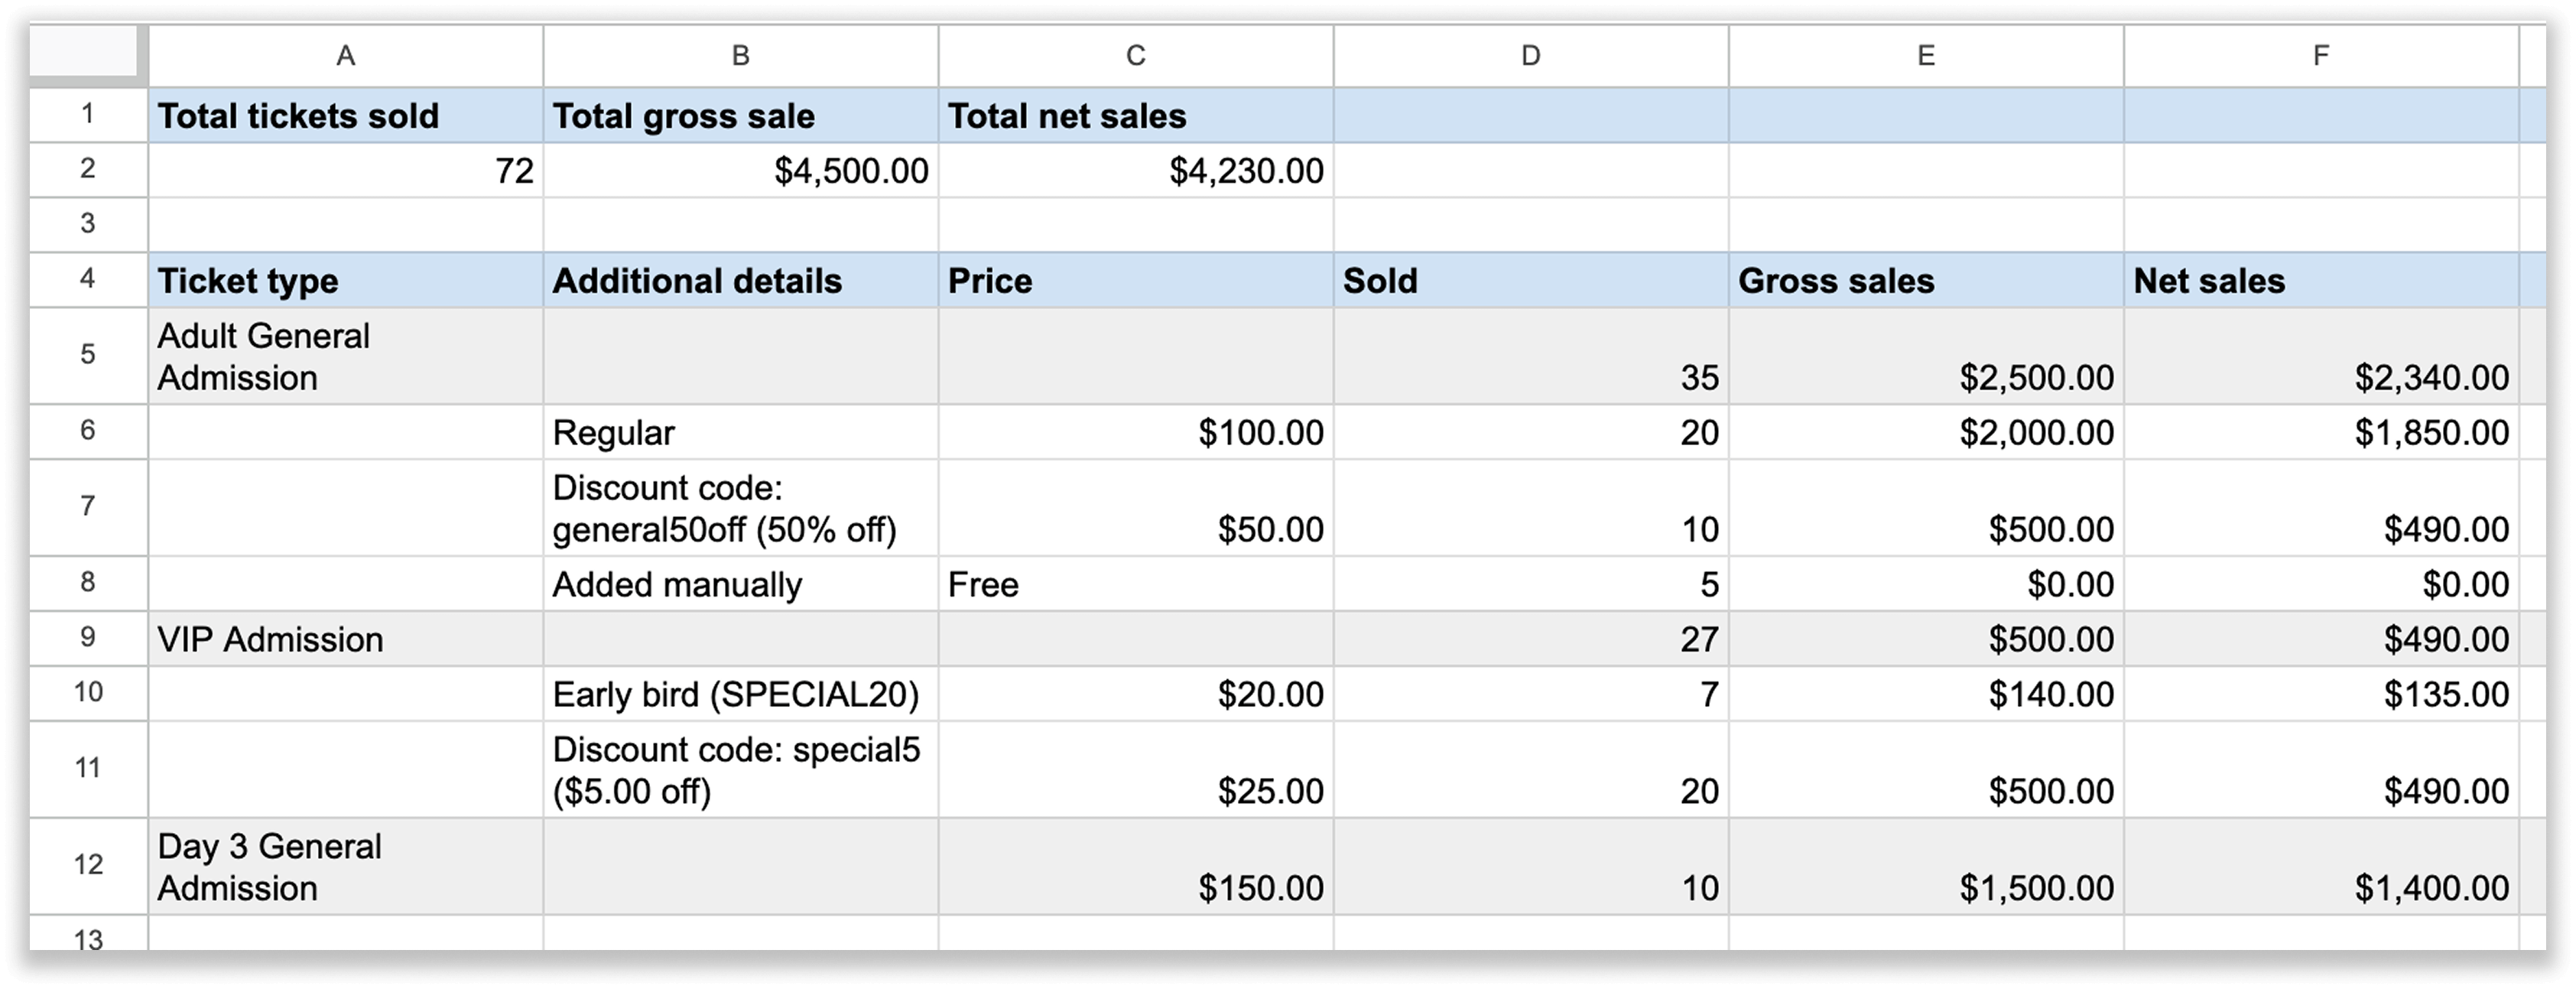
Download your ticket sale summary to export metrics like gross and net sales, and the discount codes/amounts applied for each ticket.
Get Started with Our Discount Code Enhancement
Whova’s discount code enhancement is all about making a popular tool faster to set up, easier to control, and more convenient to analyze. Organizers can configure codes in minutes with bulk import, control application without relying on endless single-use codes by limiting to one per buyer, and keep campaign management organized and effective with exportable summaries.
If you’re already using Whova Registration, these options will fit right into your existing Discount Codes workflow. If you’re looking for a more efficient way to manage event registration and special discounts all in one system, learn more about Whova’s robust registration and get a price quote today.